Whitelisting
Why Whitelisting?
Phishing simulations assume that open and click functions are performed by real humans, rather than mail gateways. This is not always the case and some mail filters will sandbox links if whitelisting is not set up correctly.
Whitelisting is required as it helps ensure emails are delivered to your learners as well as to ensure Phishing Simulations can be delivered without being sandboxed.
A sandbox is an isolated testing environment that enables users to run programs or execute files/links/attachments without affecting the application, system or platform on which they run. This helps to prevent malicious software from infecting your or your staff's computers.
However, when phishing campaigns are sandboxed, the sandboxing application will also click on the email links.
When a campaign is sandboxed it is common for the click values to be high and occur in a short period.
We have built in a safeguard for this event, and if a campaign fail rate is greater than 50% in a short period we will prevent the following automatic actions from happening:
Enrolling learners in failed phishing training
Sending failed phishing notification
If you have a campaign flagged in this way, you can investigate the location of the clicks by visiting a failed learner's dashboard. In the email log it will show you the IP / location of the click event. Usually, this is an IP of a mail filter like Office 365 or Mimecast.
Sending Domains
To prevent emails from going to spam, blocked, or detonated by mail filters you will need to whitelist the below domains:
office-email.com.au
account-secure-login.com
app-gemail.com
app-g-secure.com
secure-g-accounts.com
login-gapps.com
securelogin-gservices.com
accounts-secure.com
securesystem-login.com
securelogin-account.com
accounts-moffice.com
accounts-office.com
secure-login-office.com
msoft-services.com
office-securelogin.com
securelogin-bank.com
app-finance.com
fraudteam-finance.com
corporatesecurityalert.com
networkprotectionteam.com
itsecurity-alerts.com
employeeverification-system.com
datasecurity-notice.com
corporatealert-system.com
usercompliance-check.com
dataprotection-service.com
emailverificationdesk.com
corporateit-support.com
IP Address
Please also ensure the following IP addresses are whitelisted if your platform allows:
159.112.246.73
159.135.224.107
We have created the below email, you can use the template to share this information with your IT support:
Hi [name],

We are enrolling staff into regular phishing simulations and online security awareness training.
It is important that these emails are delivered to our employees inbox.
Please ensure the following IP are whitelisted for inbound delivery at our mail gateway as well as any email filters.

159.112.246.73

159.135.224.107

Thanks in advance.
Whitelist by IP Address in Google Workspace
The guide below will assist in the process of whitelisting the security portal to ensure accurate delivery and reporting of campaigns sent to Google Workspace and Google Apps accounts.
We recommend setting up a test phishing campaign to yourself or a low volume sending group after you follow the below steps to ensure your whitelisting was successful. The setting may take up to an hour to propagate to all users.
Part 1: Add sending IP addresses to Email Whitelist
We recommend setting up a test phishing campaign to yourself or a small group after you follow the below steps to ensure your whitelisting was successful. The setting may take up to an hour to propagate to all users, so wait at least an hour before testing.
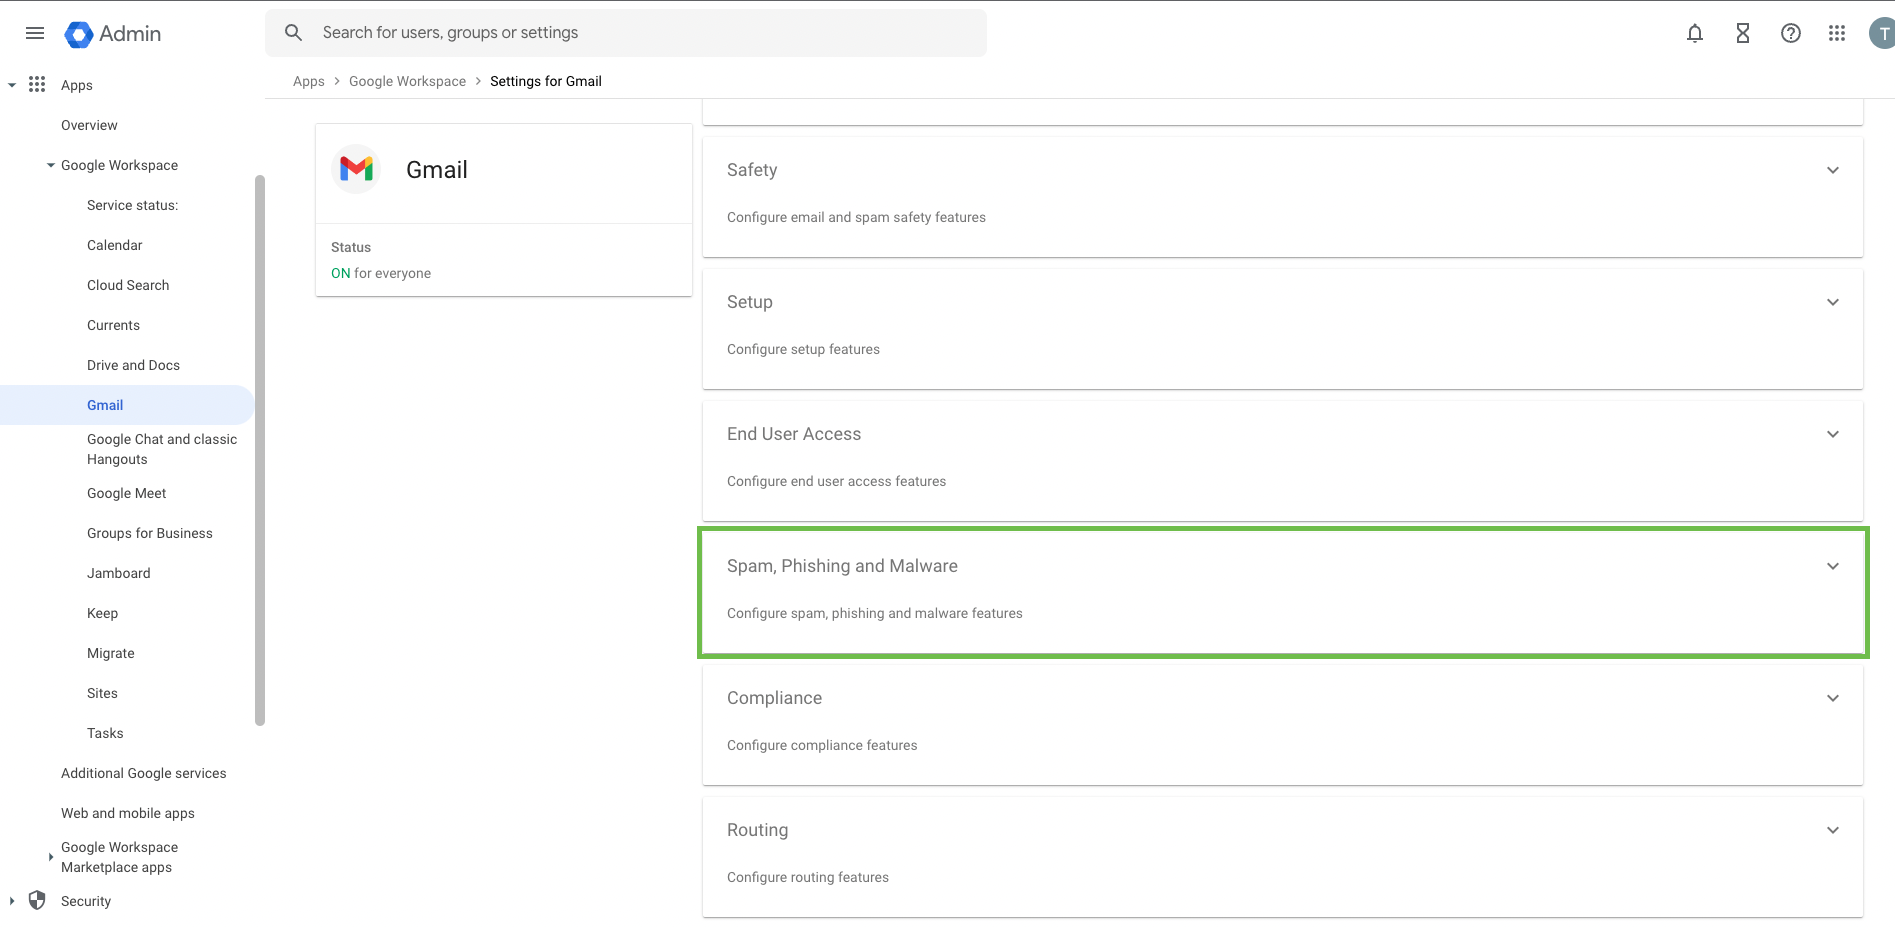
Log in to https://admin.google.com and select Apps.
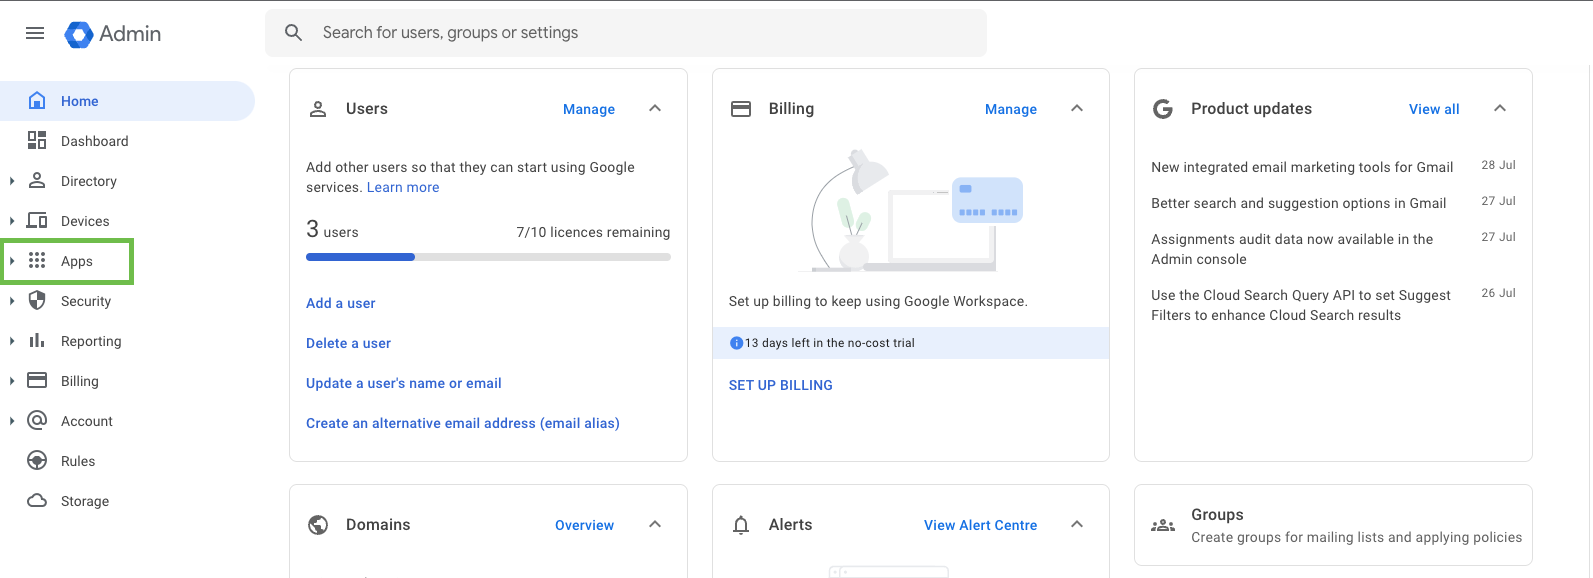
Select Google Workspaces
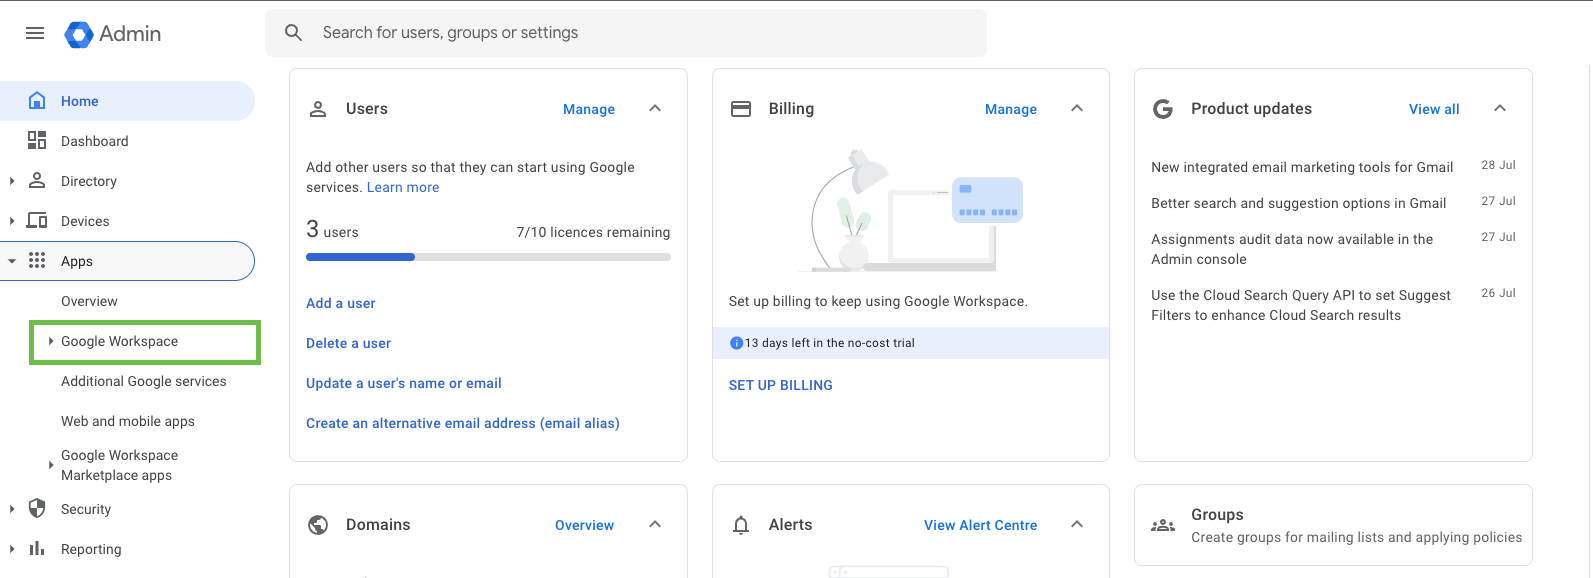
Select Gmail.
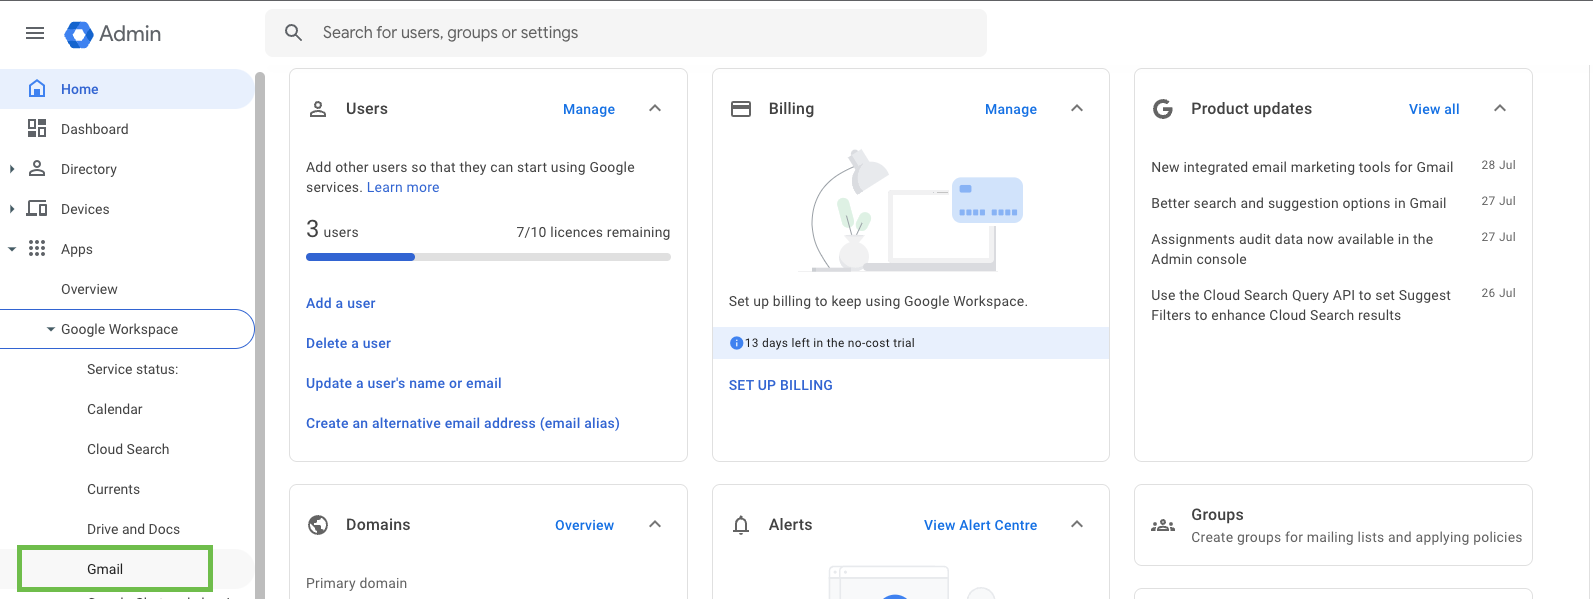
Select Spam, Phishing and Malware.
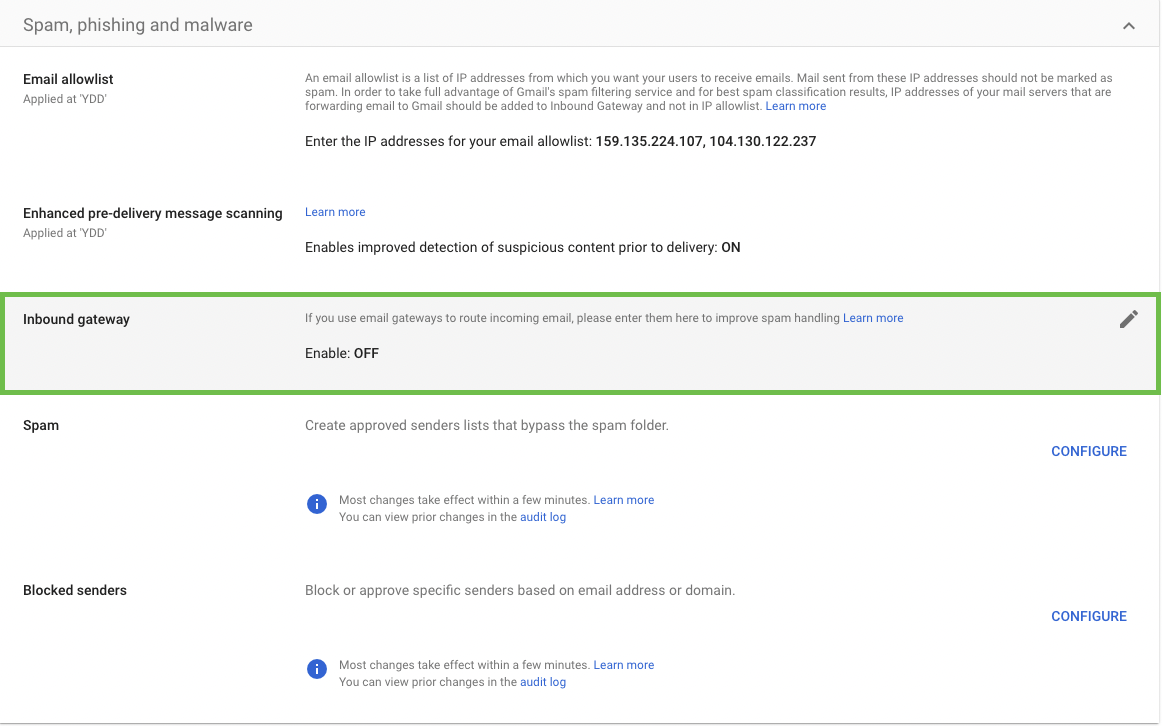
In the Email allowlist section, enter the following IP addresses separated by commas:
159.135.224.107
104.130.122.237

Part 2: Add IP addresses as Inbound Gateways
This method of whitelisting is to prevent the following Google banners from appearing in your user's inbox:

Log in to your Google Admin Console.
Navigate to Apps > Google Workspace > Gmail > Spam, Phishing and Malware.
Scroll down to the Inbound Gateway setting located under the Spam, Phishing and Malware section. Hover over the setting and click the Pencil icon. This will open the Inbound gateway screen.
Configure the Inbound gateway using the settings below:
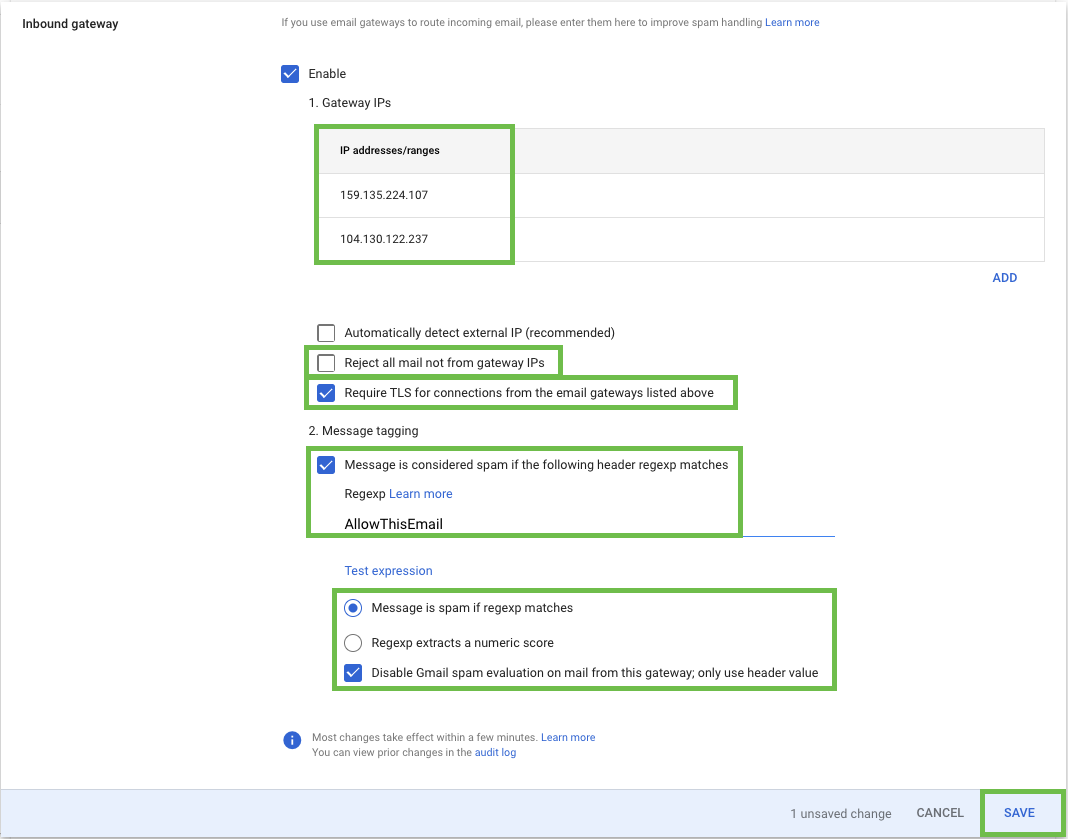
Gateway IPs
Add the IP Addresses for:159.135.224.107
104.130.122.237
Leave the Reject all mail not from gateway IPs option unchecked.
Check Require TLS for connections from the email gateways listed above.
Message Tagging
Enter text "AllowThisEmail" for the Spam Header Tag.Select the Disable Gmail spam evaluation on mail from this gateway; only use header value.
Click the ADD SETTING button.
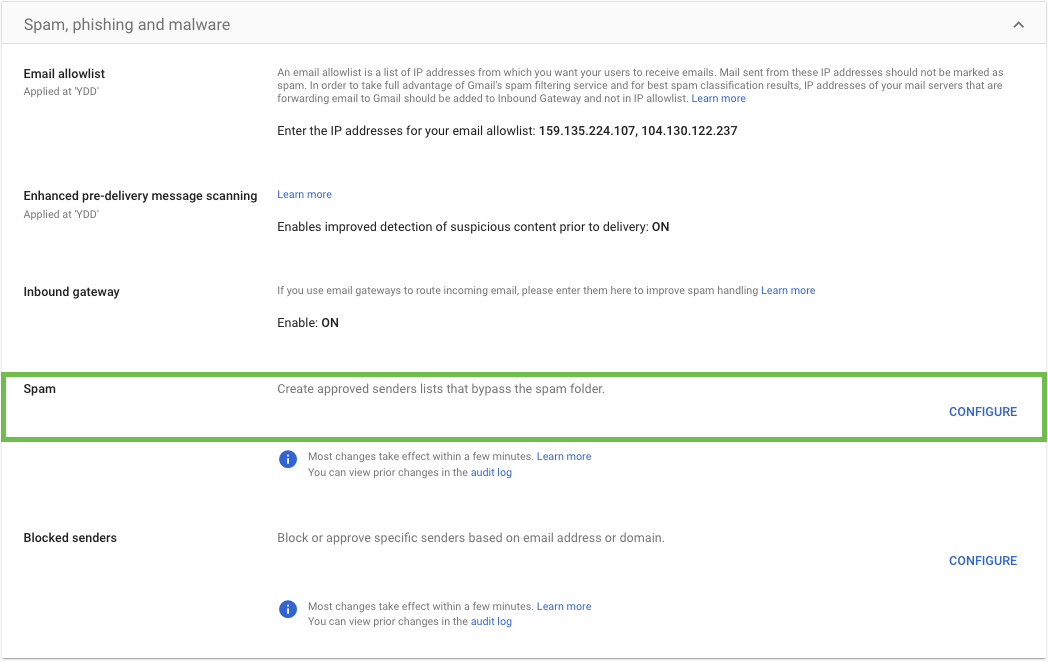
Part 3: Create approved sender lists
Adding the sender domains will ensure emails aren’t sent to spam.
Log in to your Google Admin Console.
Navigate to Apps > Google Workspace > Gmail > Spam, Phishing and Malware.
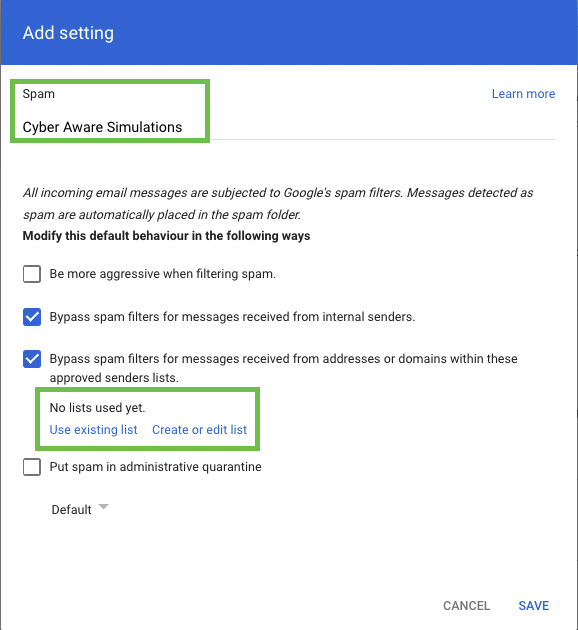
Scroll down to the Spam setting located under the Spam, Phishing and Malware section. Hover over the setting and click the Configure icon.
For the name type in “Cyber Aware Simulations”
Click on Create or edit list
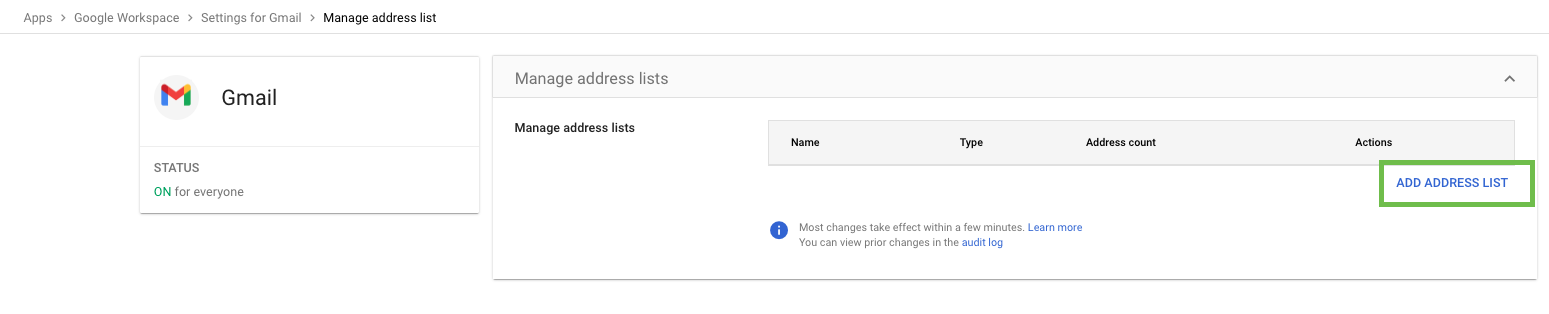
A new tab will open up, you may be asked to reauthenticate
Click on ADD ADDRESS LIST
Under Name type in “CA Sender Domains”
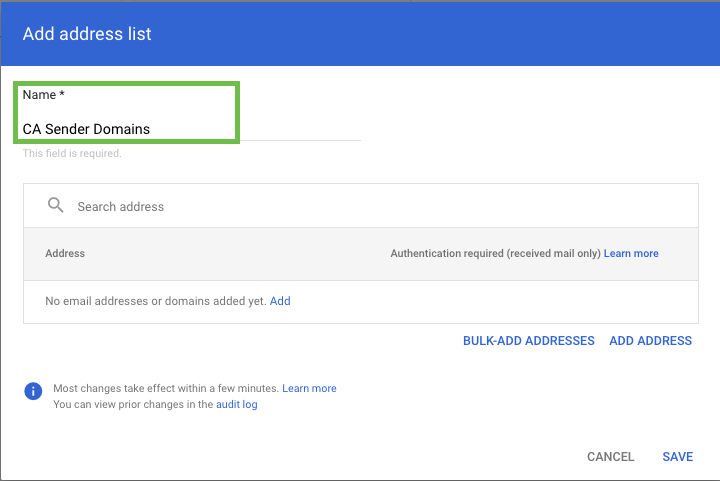
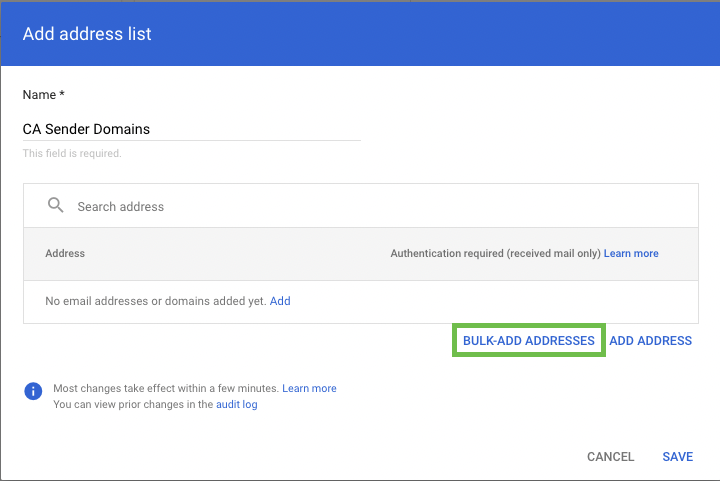
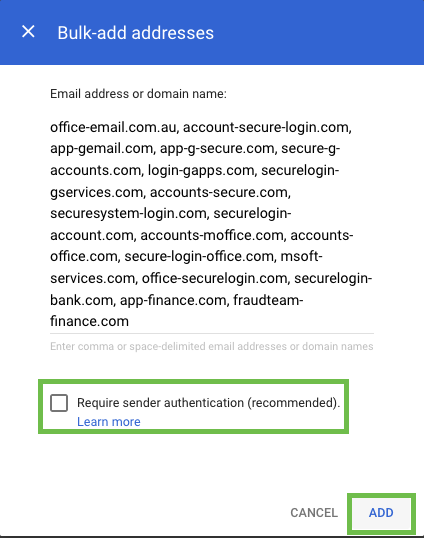
Click on BULK-ADD ADDRESSES
Copy and paste the below domain list into the field:
CODEoffice-email.com.au, account-secure-login.com, app-gemail.com, app-g-secure.com, secure-g-accounts.com, login-gapps.com, securelogin-gservices.com, accounts-secure.com, securesystem-login.com, securelogin-account.com, accounts-moffice.com, accounts-office.com, secure-login-office.com, msoft-services.com, office-securelogin.com, securelogin-bank.com, app-finance.com, fraudteam-finance.comUntick the Require Sender Authentication box and click on ADD
Navigate back to the previous tab and select the Address List we just created
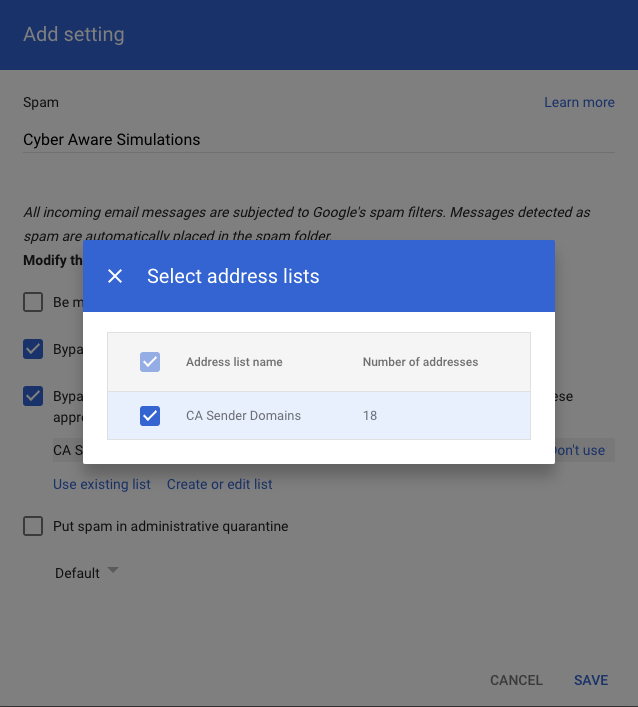
Click Save and confirm whitelisting is correct by performing a phishing simulation test
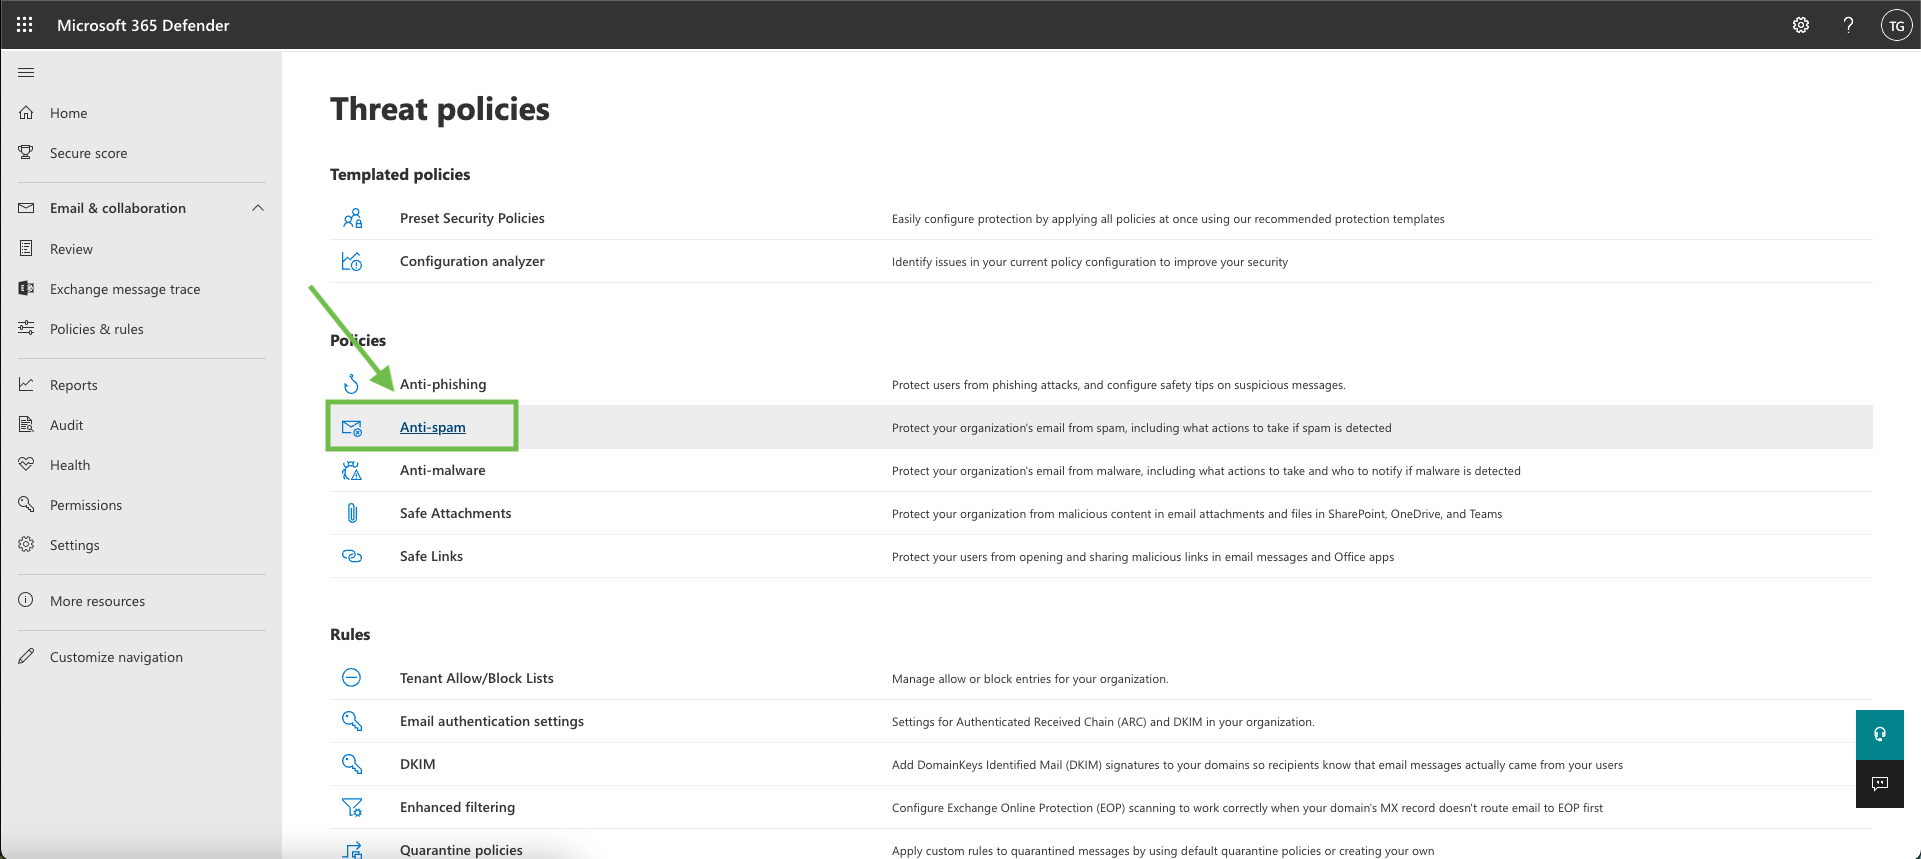
Microsoft 365 Security - Whitelisting
Whitelist Cyber Aware email servers
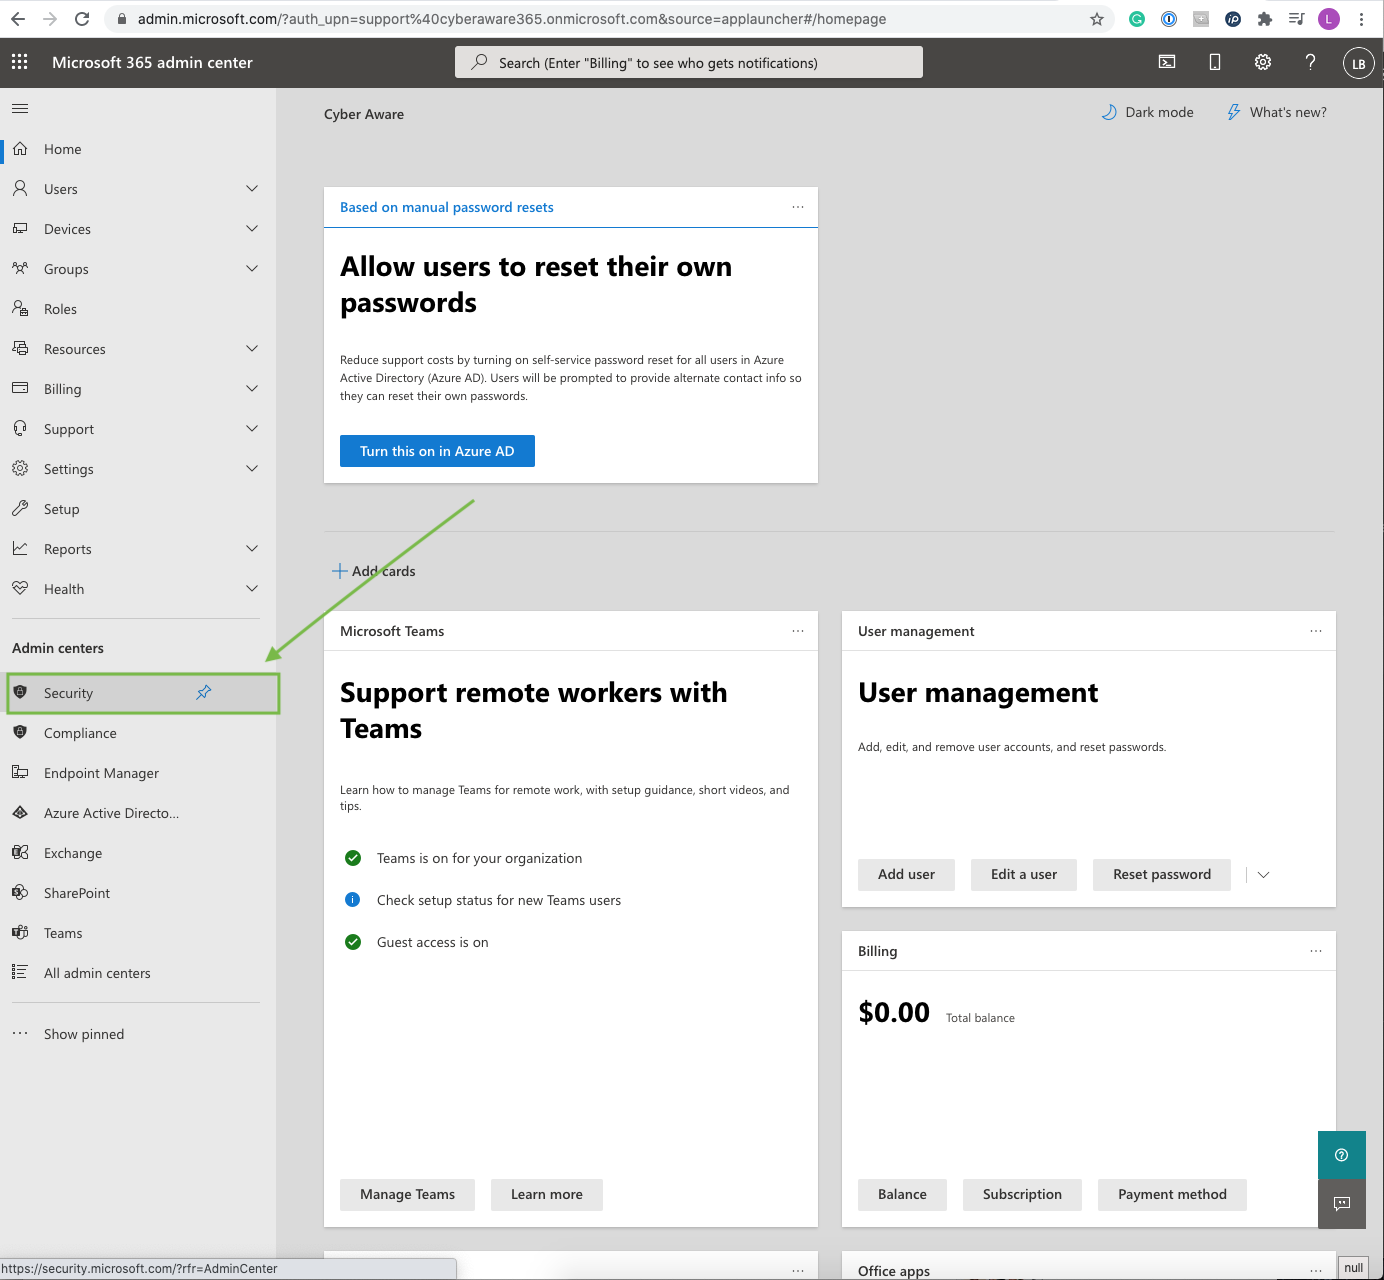
Log in to Office 365 and go to Security
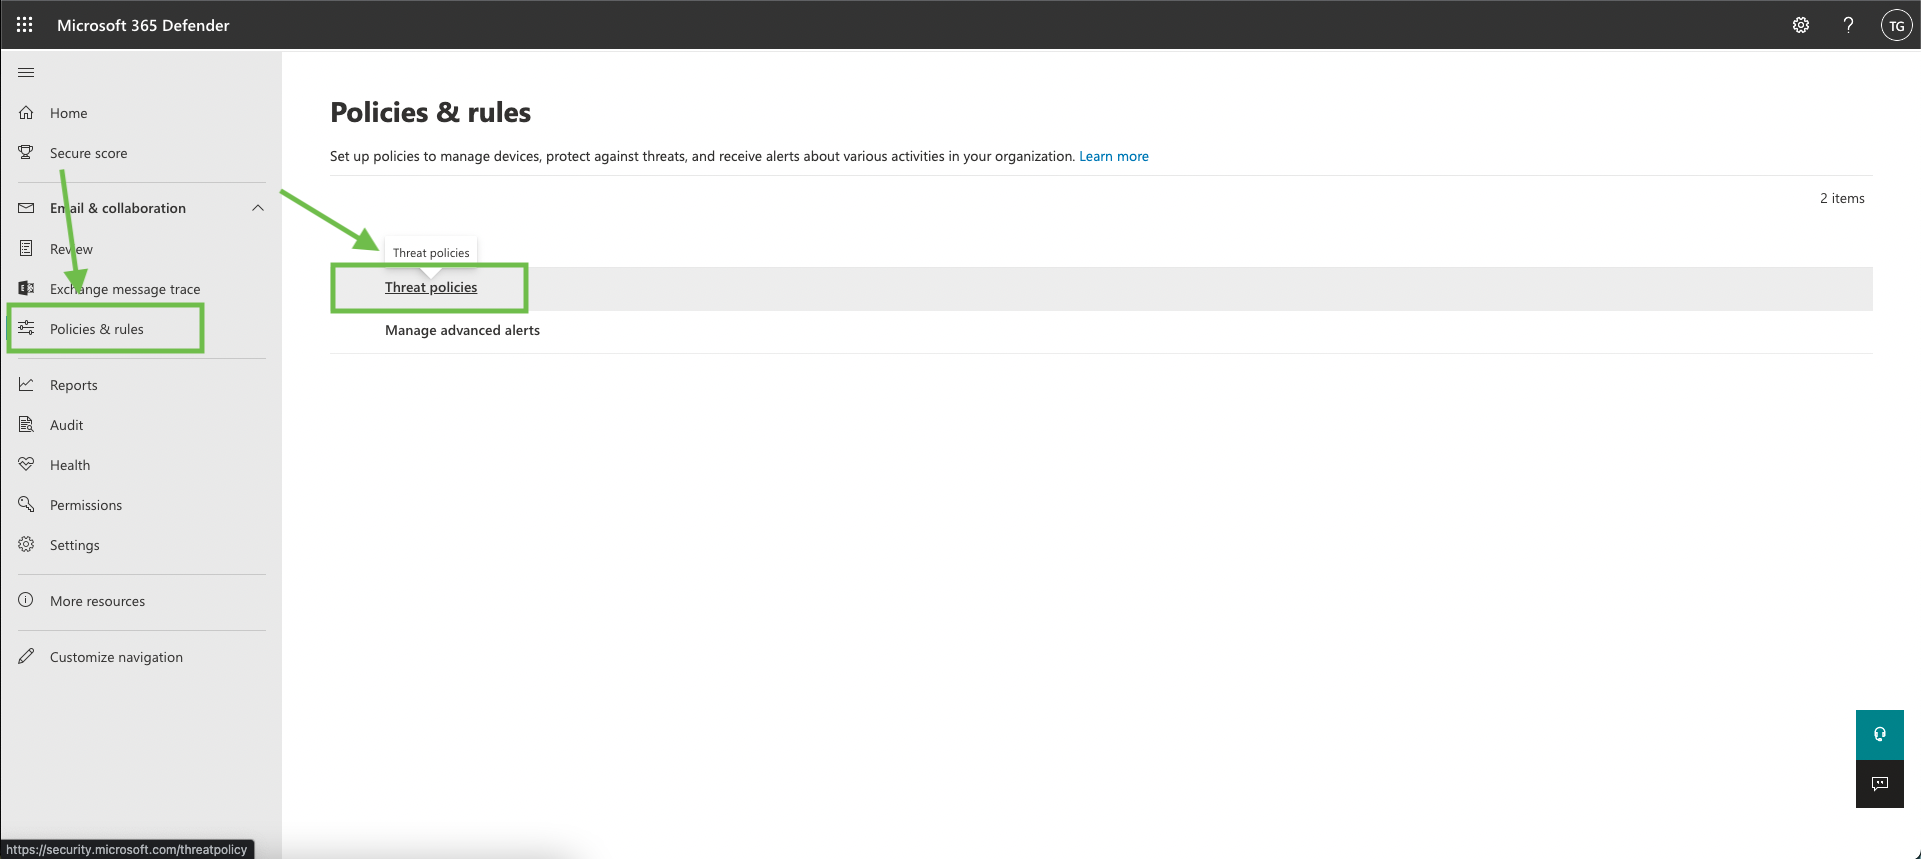
Go to Policies & rules > Threat policies
Click on “Anti-spam”
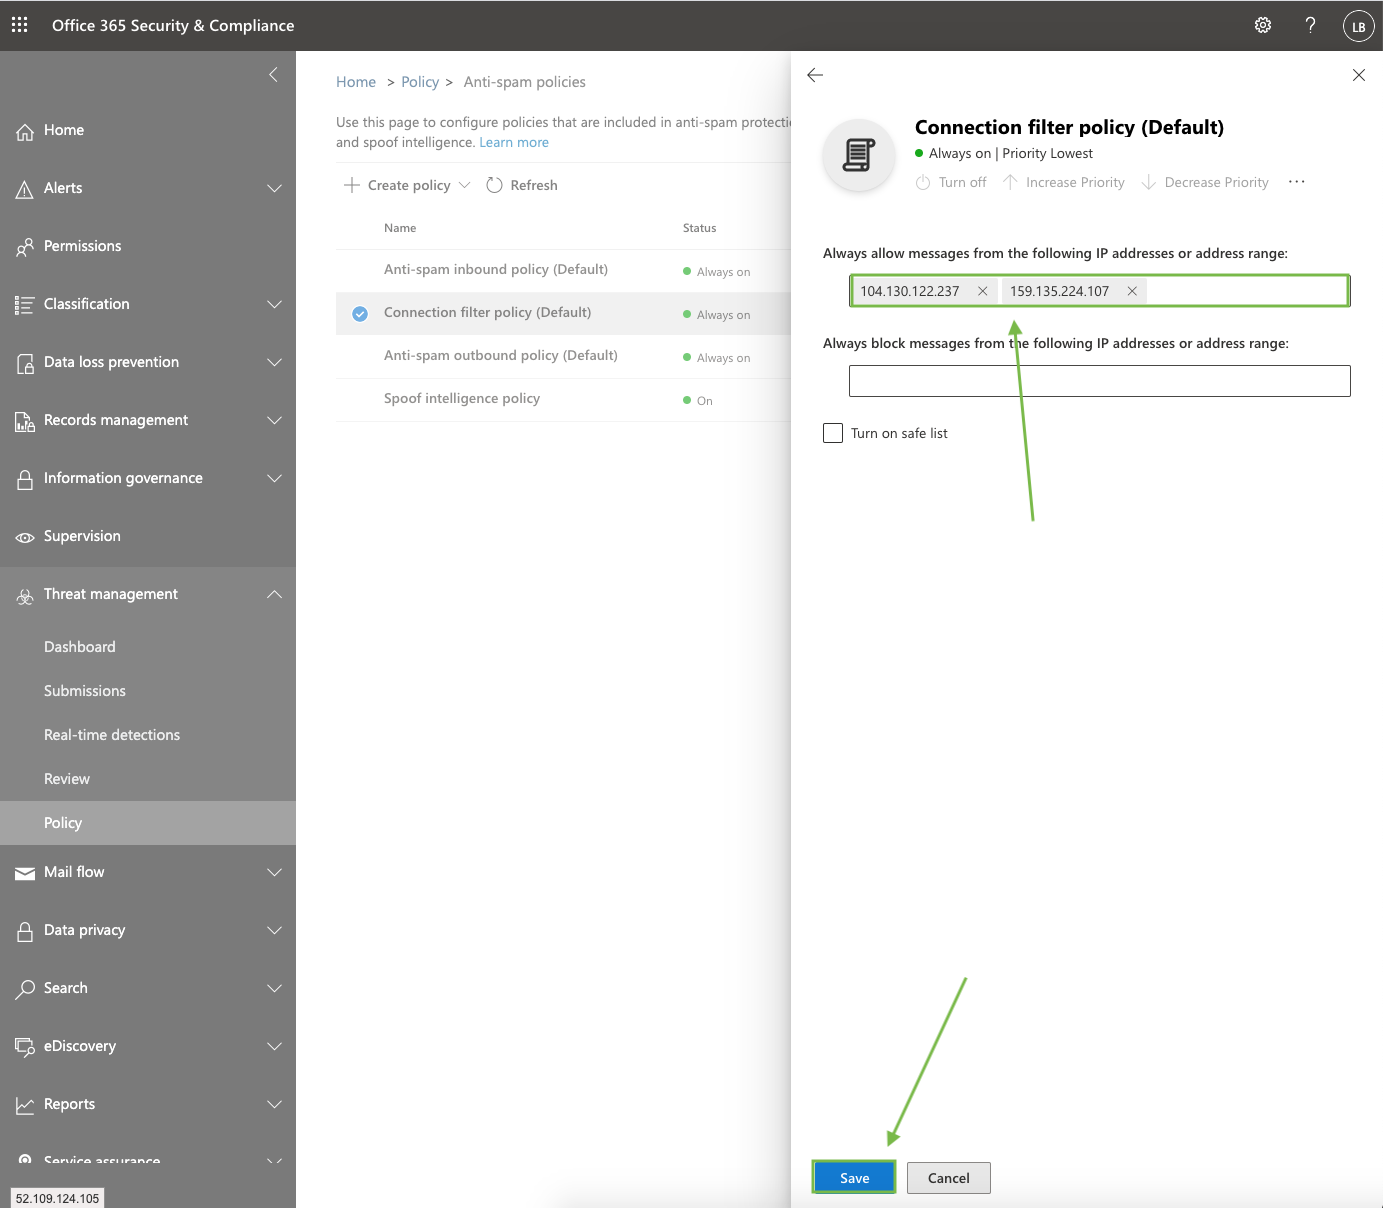
Double click ‘Connection Filter Policy’ > Click Edit Connection Filter Policy
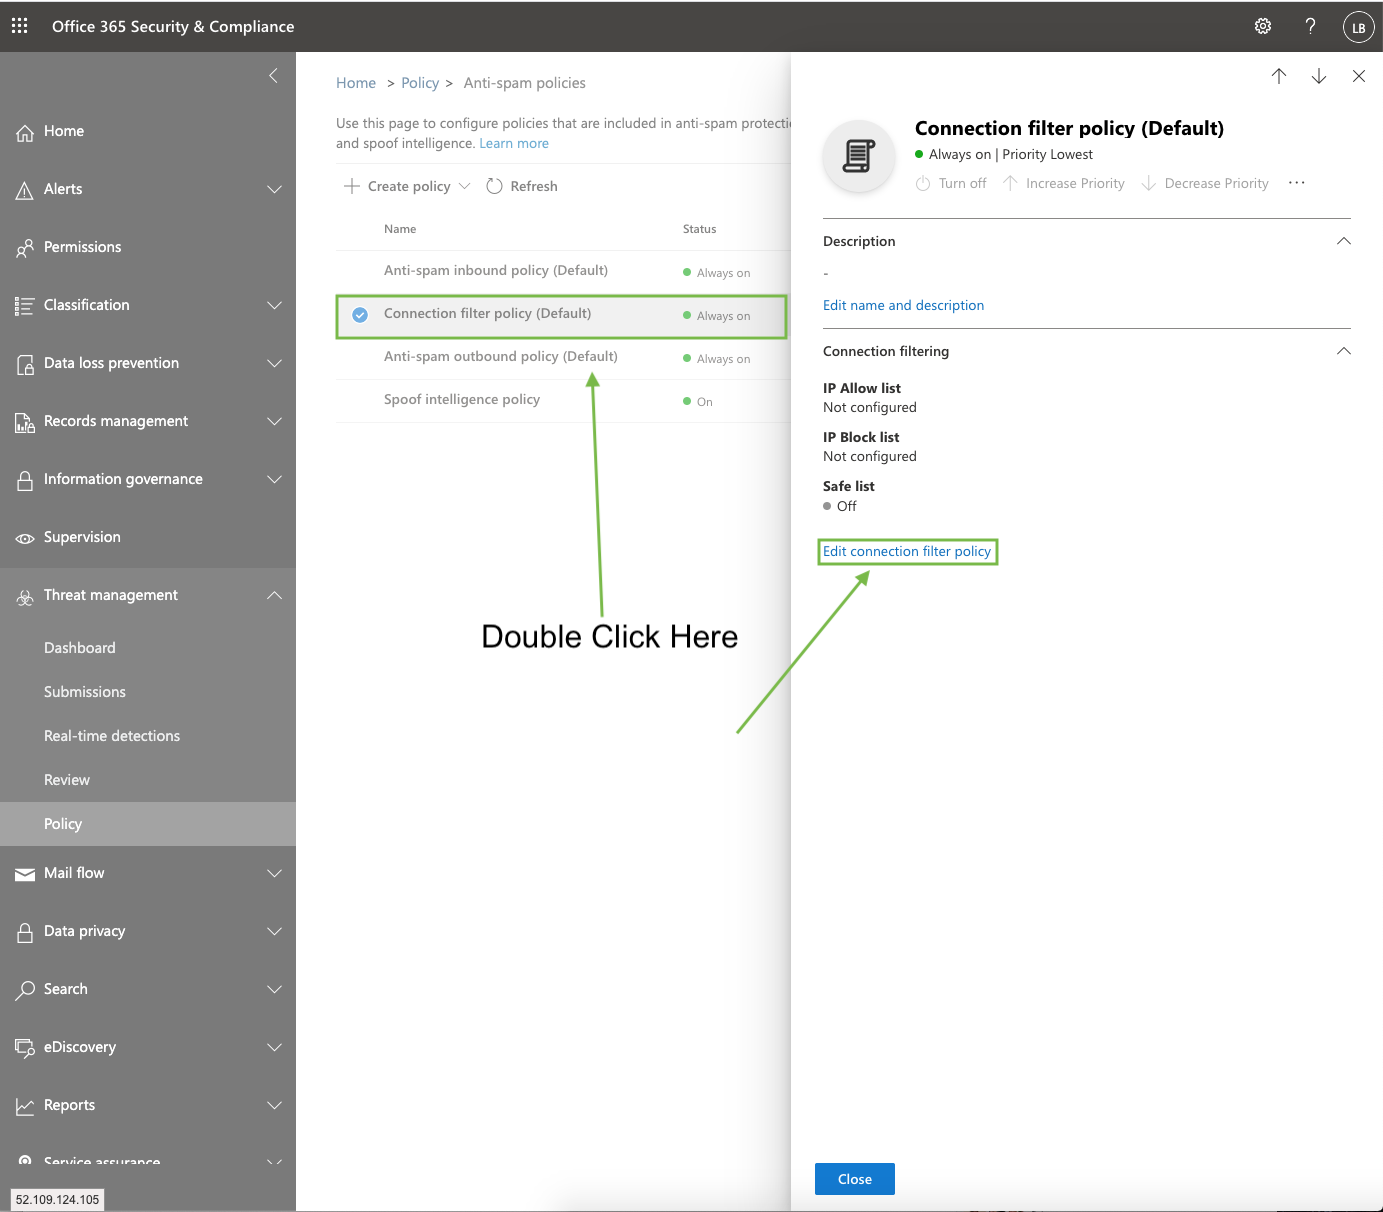
Enter the following IP Addresses then click Save:
104.130.122.237
159.135.224.107
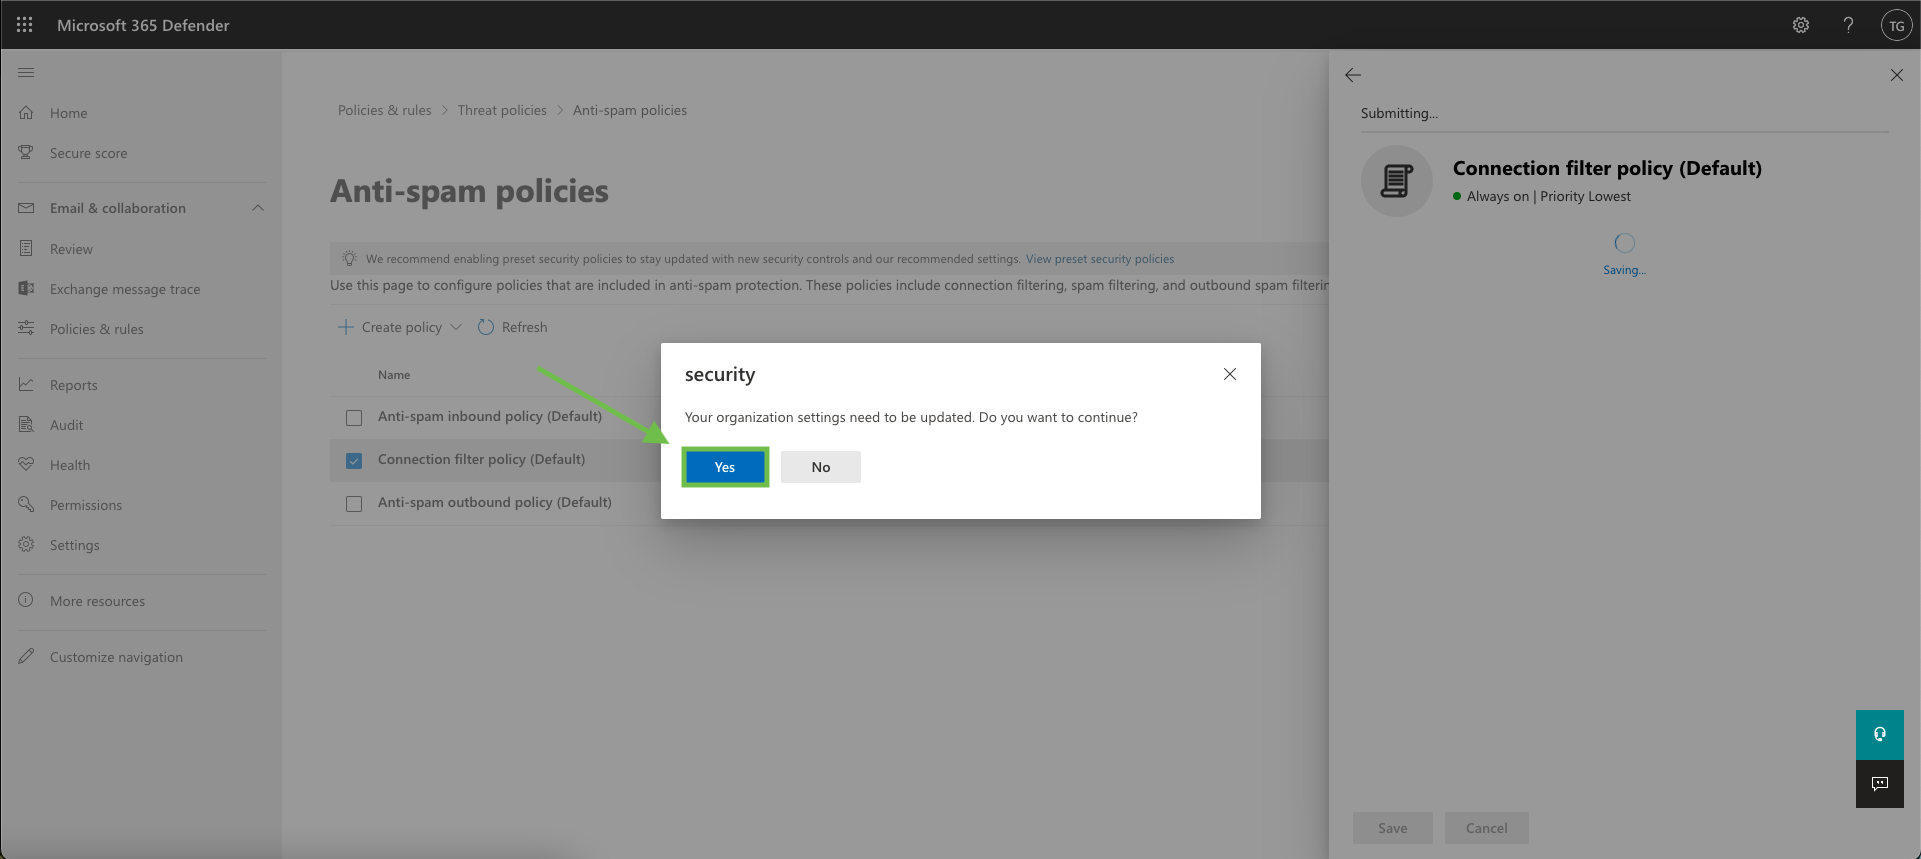
If the following prompt pops up, click Yes
Add Mail Flow rules to bypass Spam Filtering and Clutter
Go to your Exchange admin center.
This can be found via the following URL: https://admin.exchange.microsoft.com
Go to Mail Flow > Rules
Create a Bypass Spam Filtering Rule
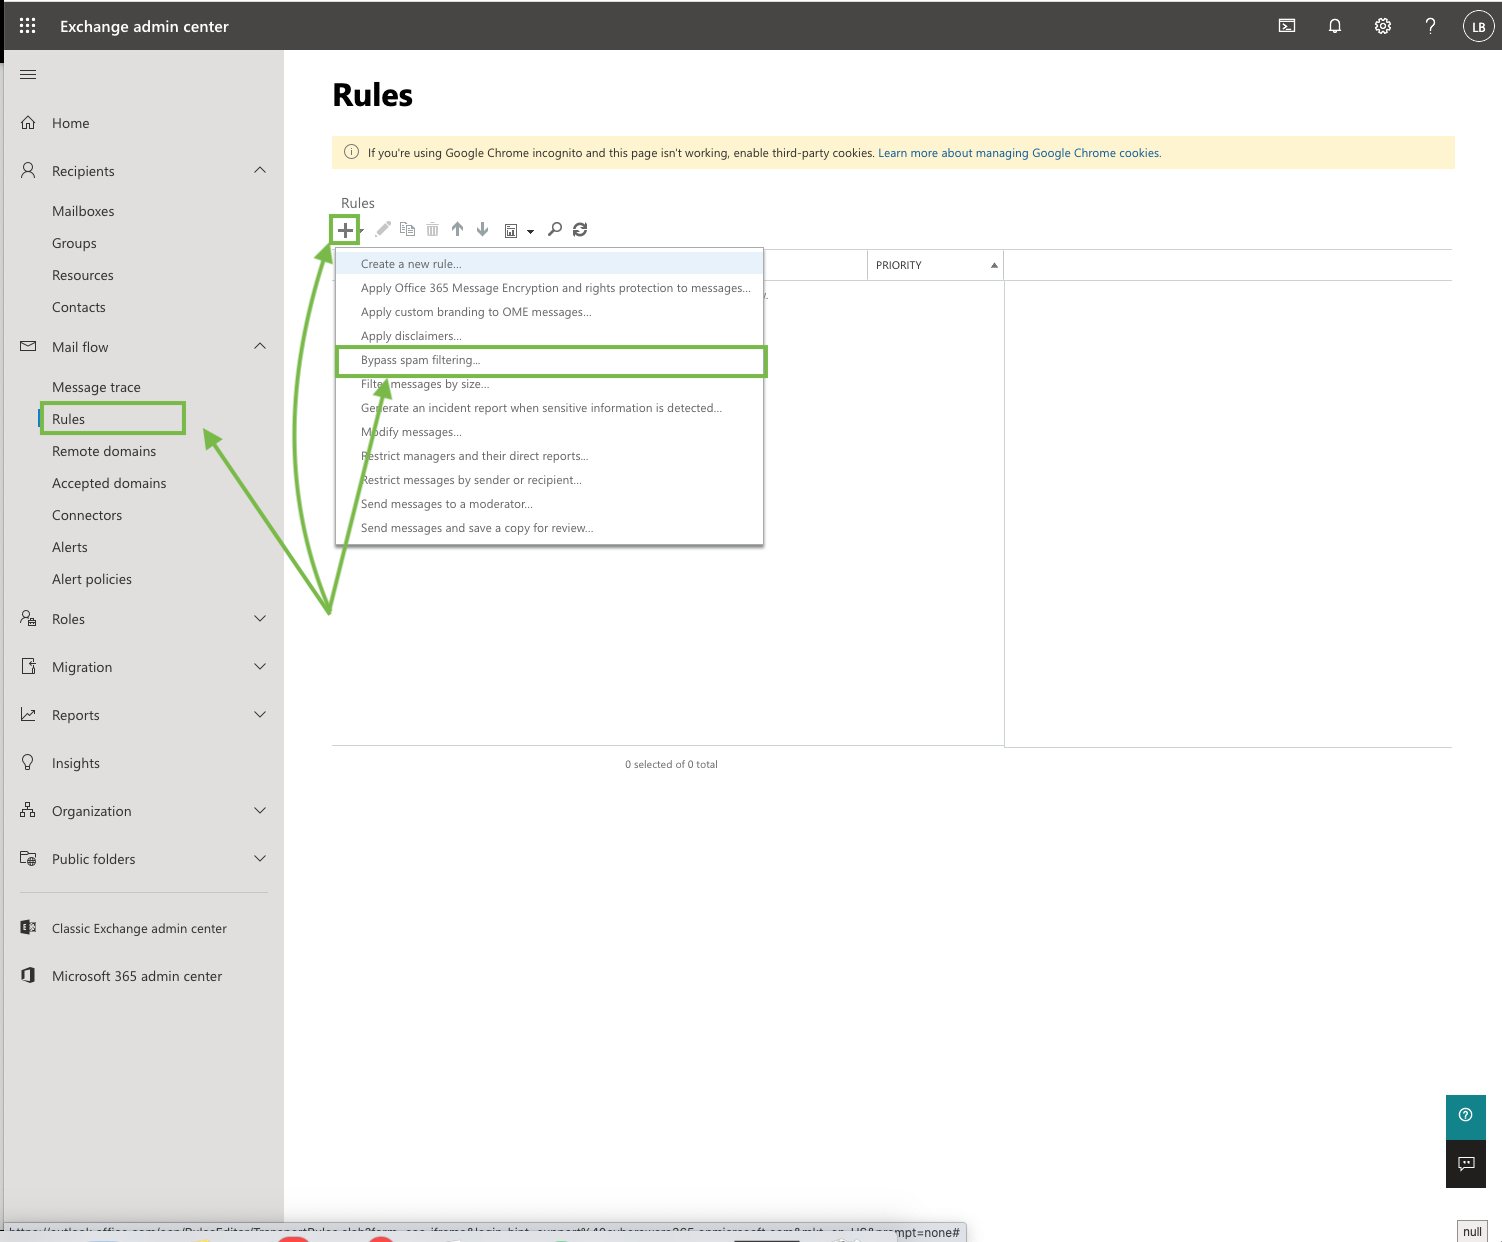
Fill in the following details
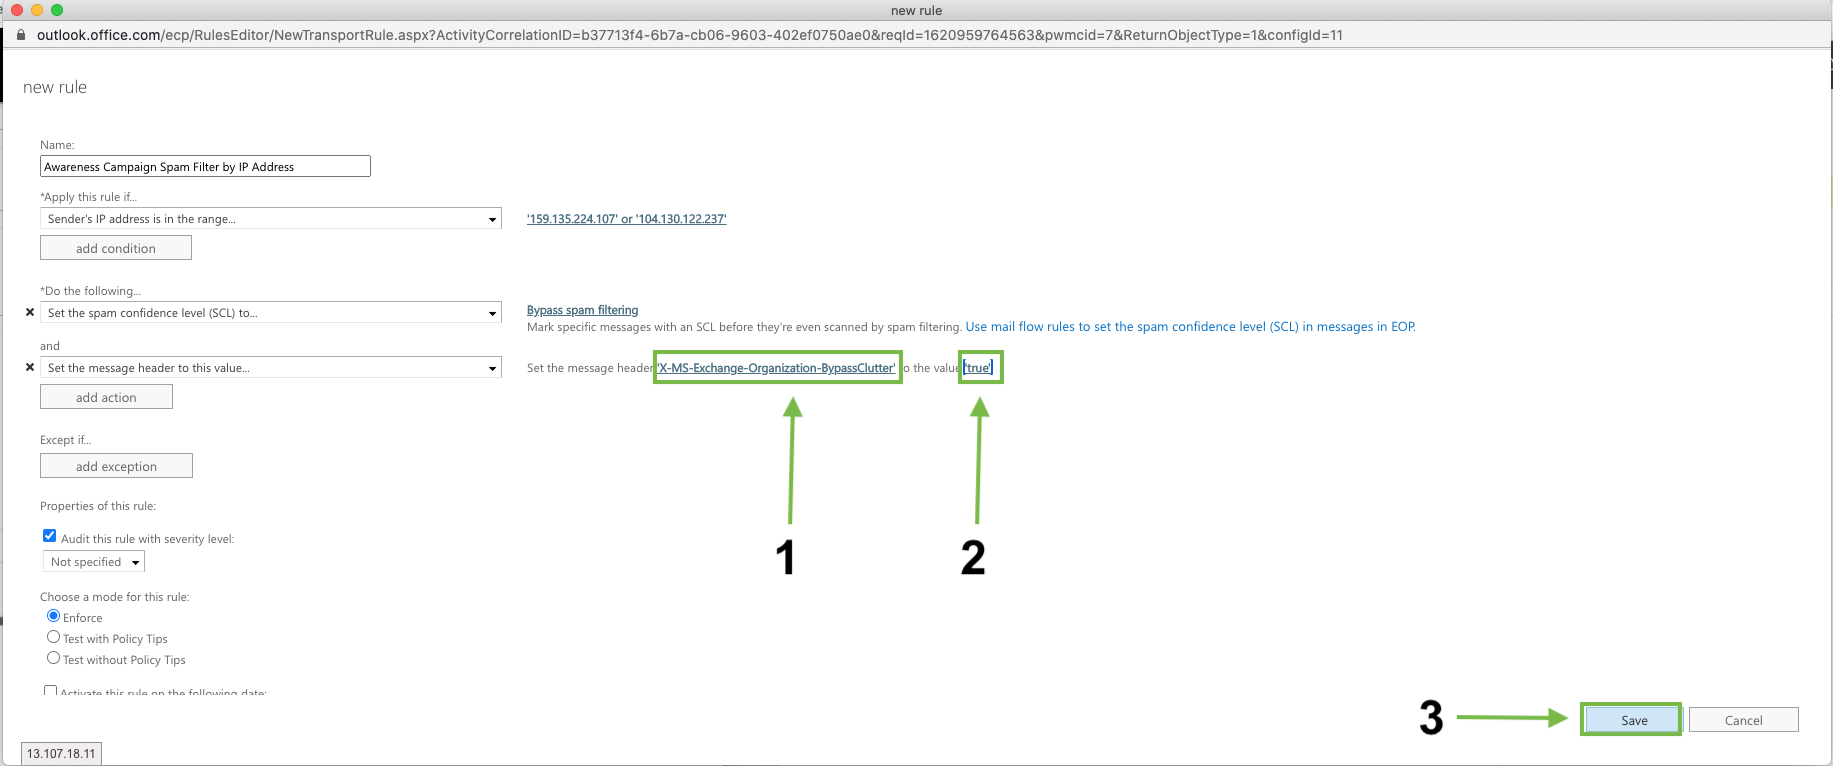
Name: Awareness Campaign Spam Filter by IP Address
Apply this rule if: The sender IP address is any of these ranges or exactly matches
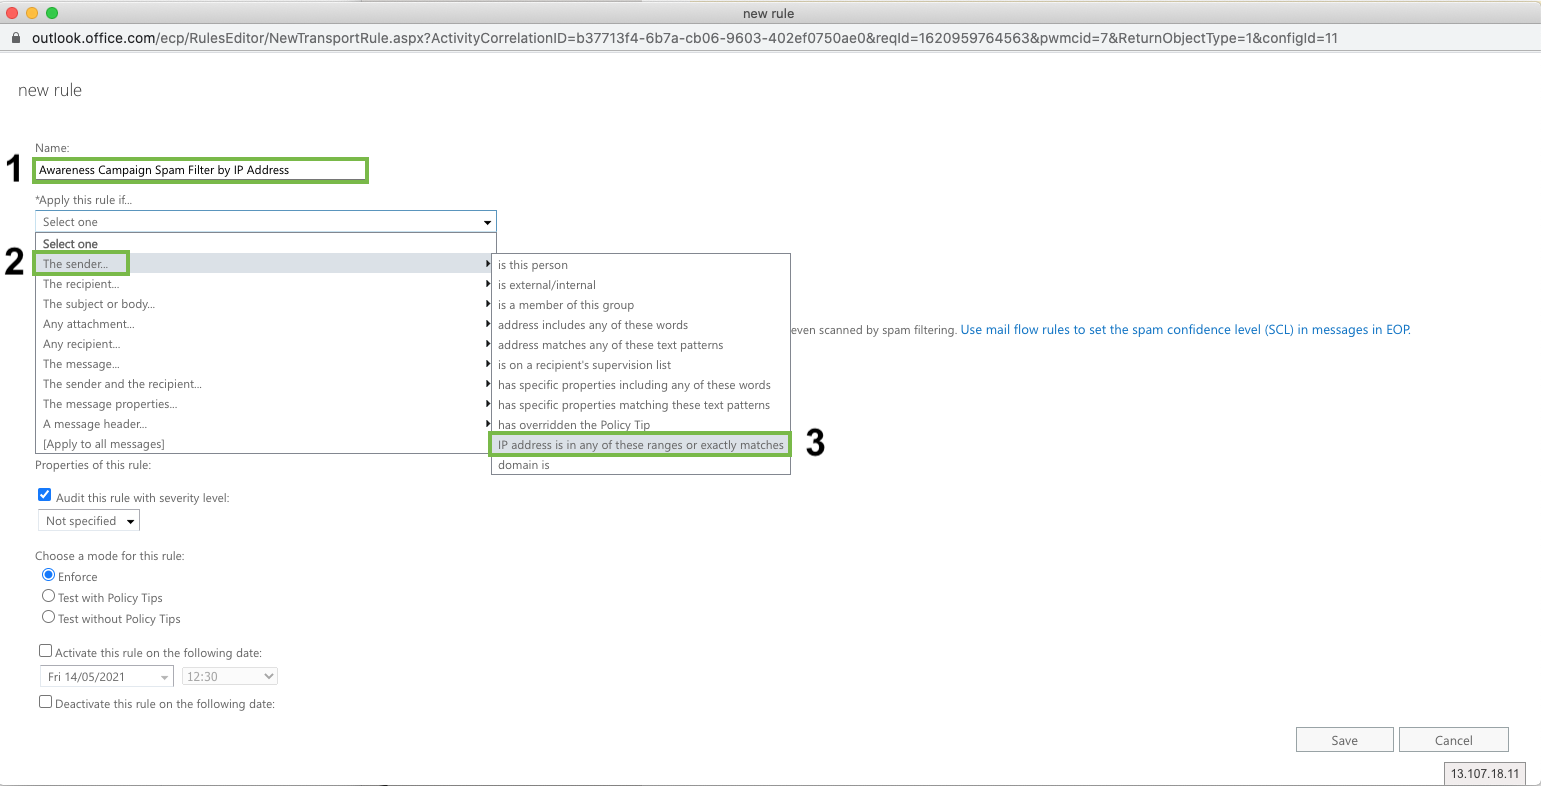
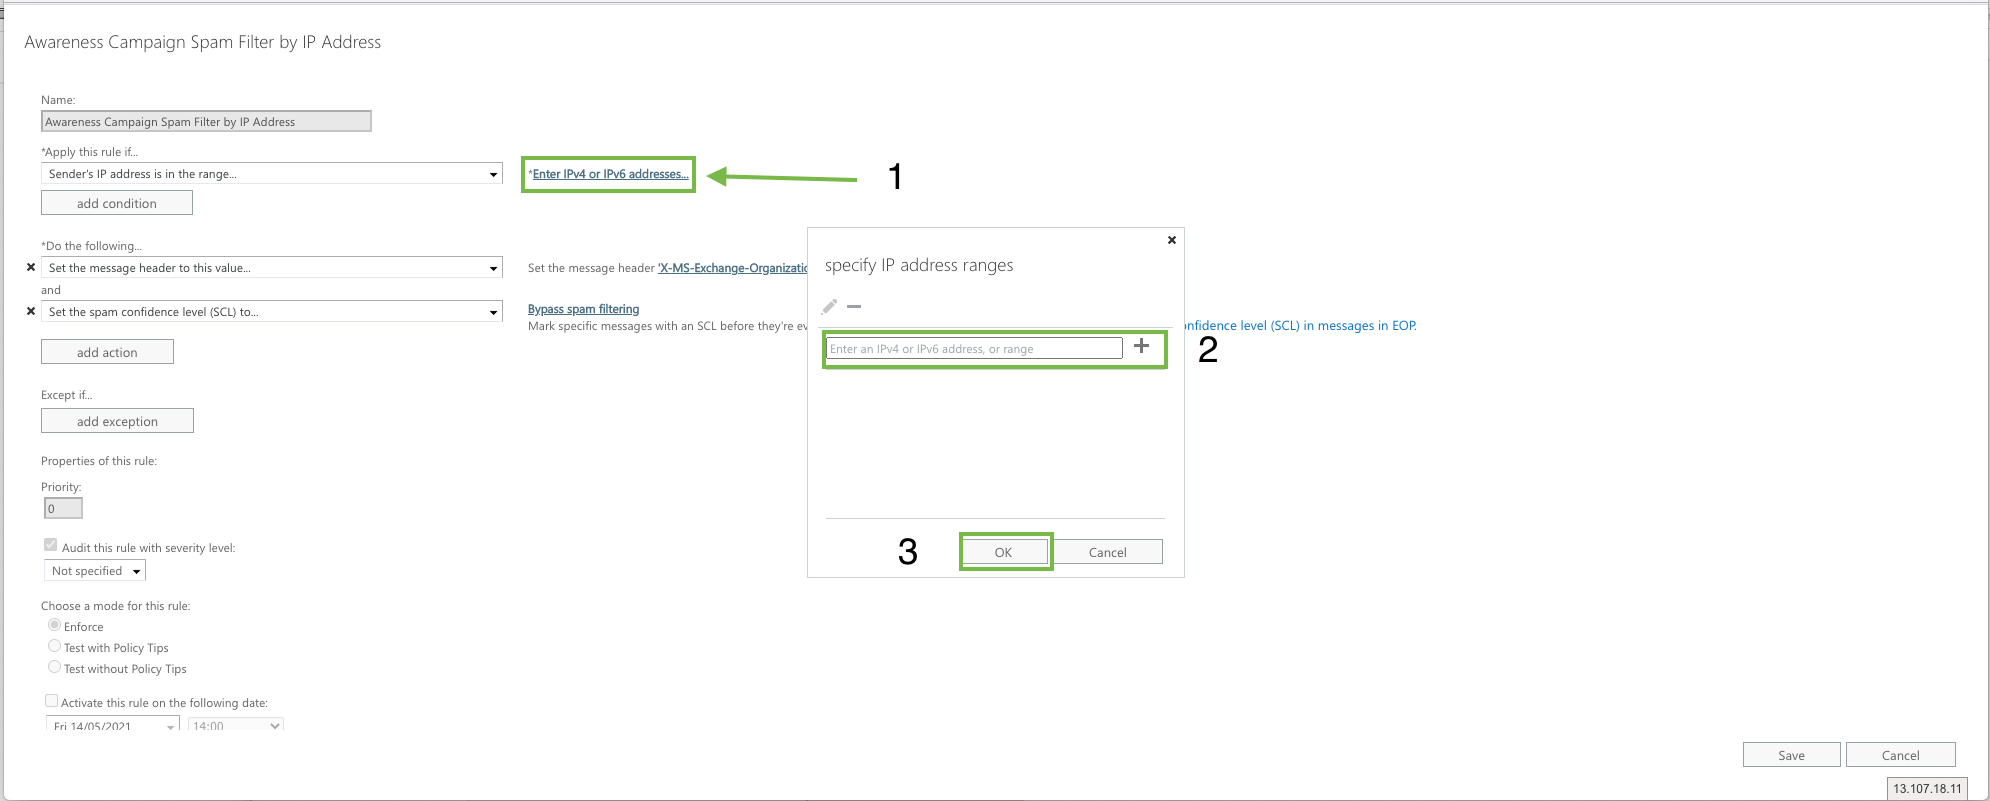
Click “Enter IPv4 or IPv6 addresses...” and enter
104.130.122.237
159.135.224.107
Add a message header
Click Add Action
Click ‘Modify the message properties’ > ‘Set a Message Header'
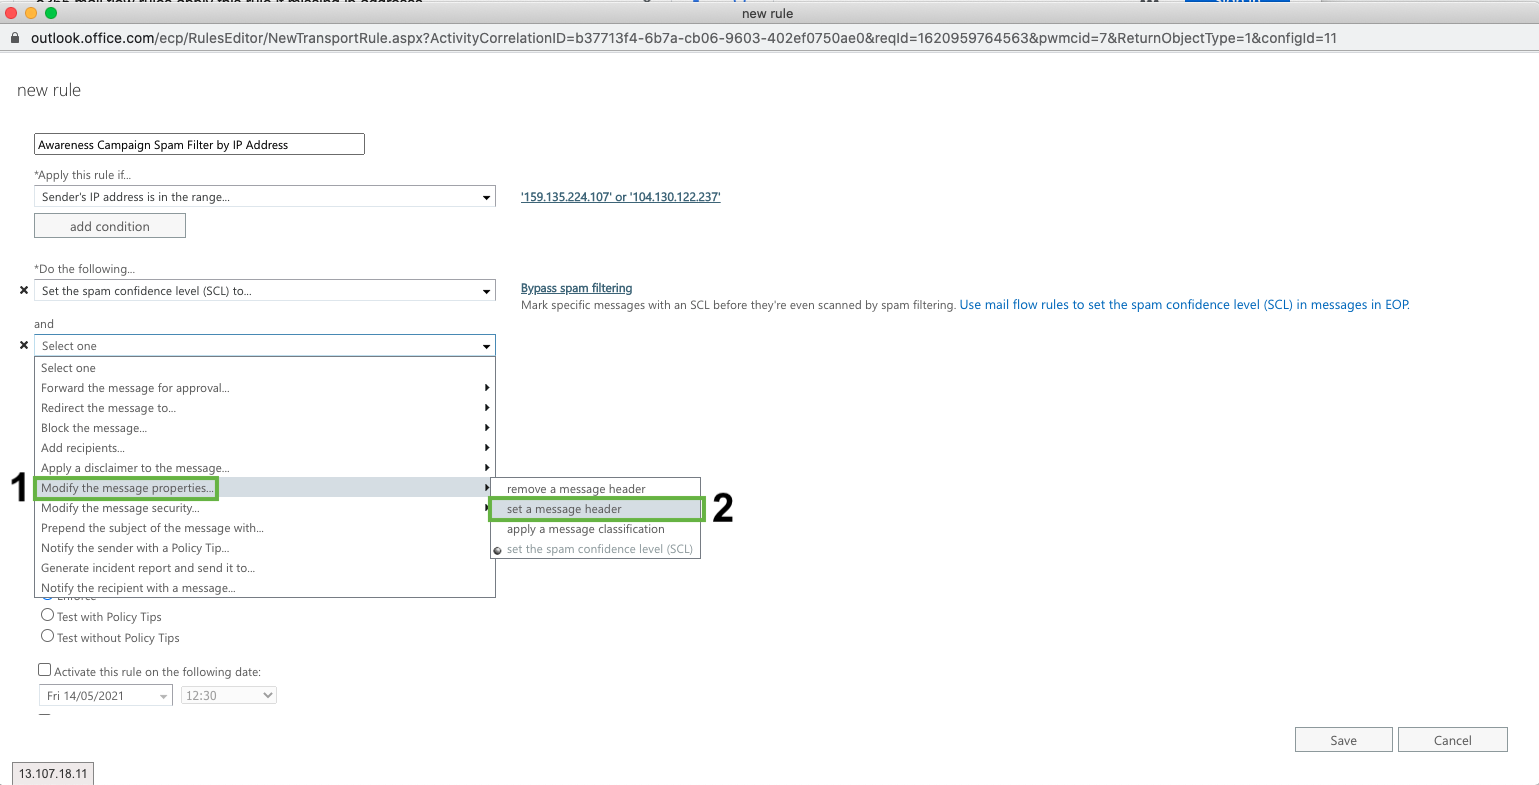
Modify the message header and value:
Click on Set a message header "Enter text..." and add the following (case sensitive!):
X-MS-Exchange-Organization-BypassClutter
Click on ... to the value “Enter text…” and add (case sensitive!):
true
Click Save
Add Mail Flow rule to bypass Focused Inbox
Go to Mail Flow > Rules
Create a Bypass Spam Filtering Rule
Fill in the following details
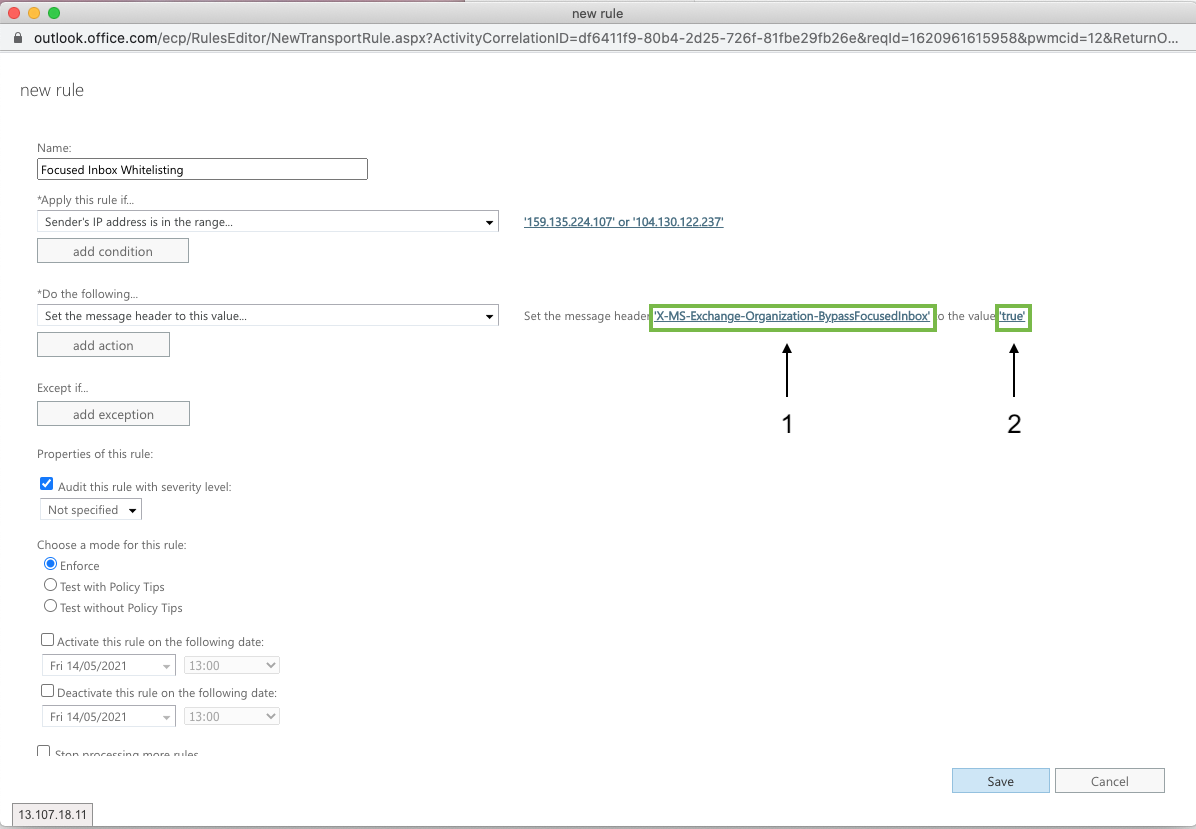
Name: Focused Inbox Whitelisting
Apply this rule if: The sender IP address is any of these ranges or exactly matches

Click “Enter IPv4 or IPv6 addresses...” and enter
104.130.122.237
159.135.224.107
Replace the Bypass Spam Filtering Rule:
Click *Do the Following….
Modify the message properties > set a message header

Modify the message header and value:
Click on Set a message header "Enter text..." and add the following (case sensitive!):
X-MS-Exchange-Organization-BypassFocusedInbox
Click on ... to the value “Enter text…” and add (case sensitive!):
true
Add mail flow rule to skip Junk Filtering
Go to Mail Flow > Rules
Create a Bypass Spam Filtering Rule
Fill in the following details
Name: Skip Junk Filtering
Apply this rule if: The sender IP address is any of these ranges or exactly matches
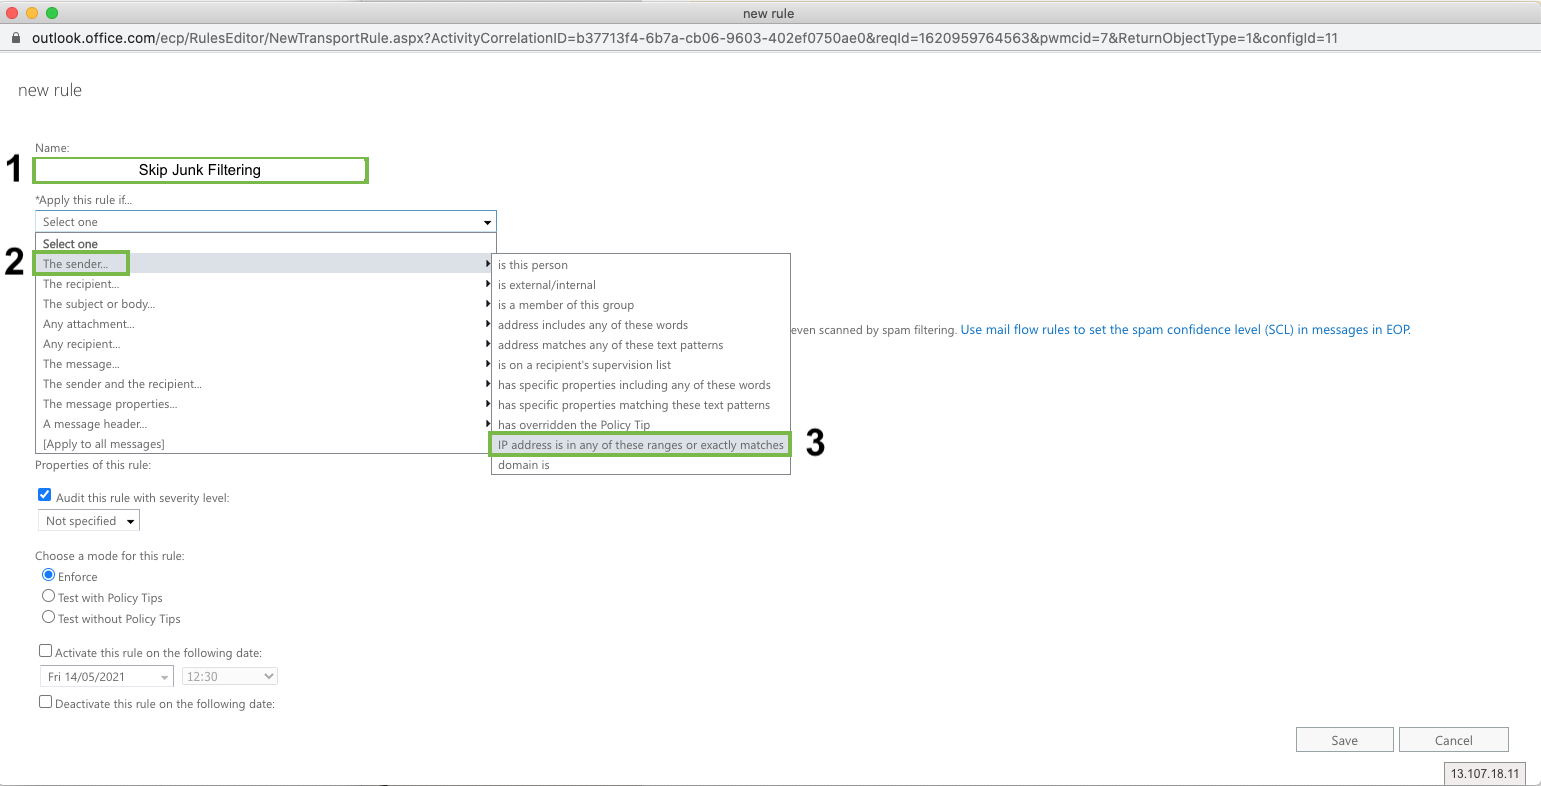
Click “Enter IPv4 or IPv6 addresses...” and enter
104.130.122.237
159.135.224.107
Replace the Bypass Spam Filtering Rule:
Click *Do the Following….
Modify the message properties > set a message header
Modify the message header and value:
Click on Set a message header "Enter text..." and add the following (case sensitive!):
X-Forefront-Antispam-Report
Click on ... to the value “Enter text…” and add (case sensitive!):
SFV:SKI;

ATP: Skip link scanning
Setting up Advanced Threat Protection Rules
Using Advanced Threat Protection can, unfortunately, cause false positives on link clicks or attachment opens. Follow our step-by-step guide below to set up rules to allow the campaign phishing emails to bypass ATP.
Go to Mail Flow > Rules
Create a Bypass Spam Filtering Rule
Fill in the following details
Name: Bypass ATP Links
Apply this rule if: The sender IP address is any of these ranges or exactly matches
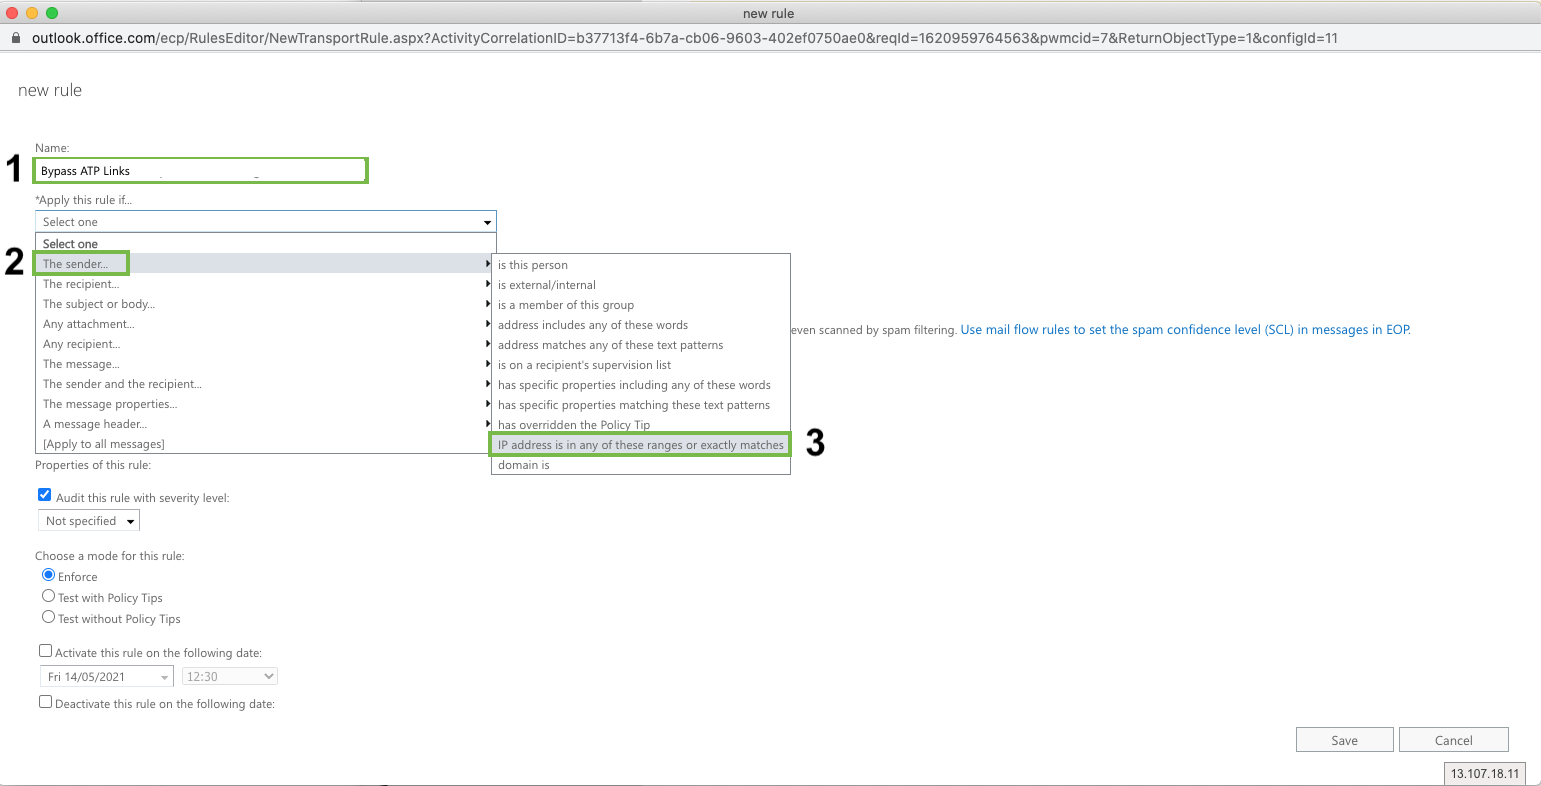
Click “Enter IPv4 or IPv6 addresses...” and enter
104.130.122.237
159.135.224.107
Replace the Bypass Spam Filtering Rule:
Click *Do the Following….
Modify the message properties > set a message header
Modify the message header and value:
Click on Set a message header "Enter text..." and add the following (case sensitive!):
X-MS-Exchange-Organization-SkipSafeLinksProcessing
Click on ... to the value “Enter text…” and add (case sensitive!):
1
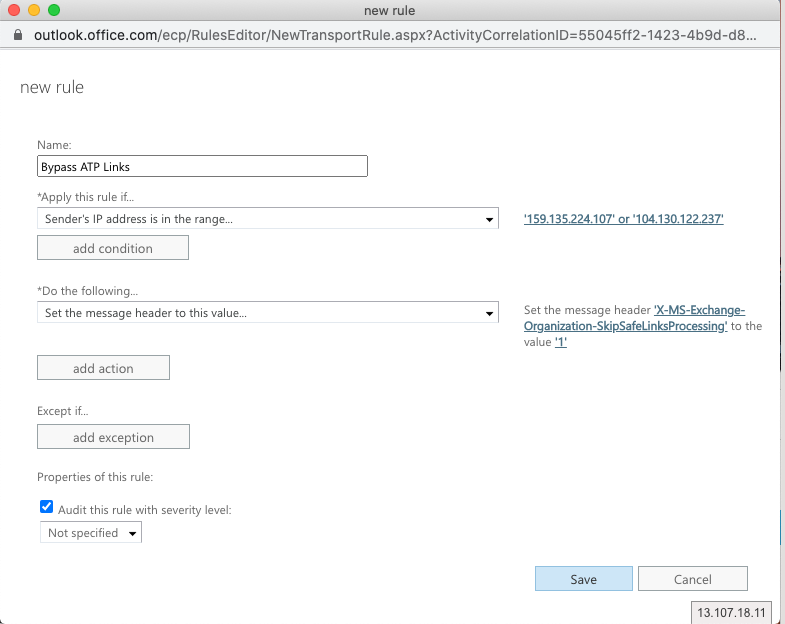
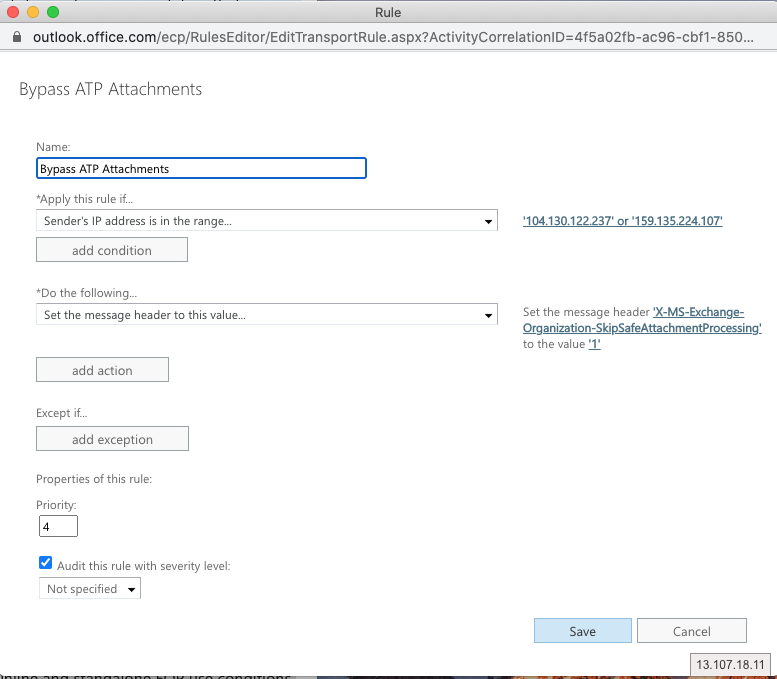
ATP: Skip attachment scanning
Go to Mail Flow > Rules
Create a Bypass Spam Filtering Rule
Fill in the following details
Name: Bypass ATP Attachments
Apply this rule if: The sender IP address is any of these ranges or exactly matches

Click “Enter IPv4 or IPv6 addresses...” and enter
104.130.122.237
159.135.224.107
Replace the Bypass Spam Filtering Rule:
Click *Do the Following….
Modify the message properties > set a message header
Modify the message header and value:
Click on Set a message header "Enter text..." and add the following (case sensitive!):
X-MS-Exchange-Organization-SkipSafeAttachmentProcessing
Click on ... to the value “Enter text…” and add (case sensitive!):
1
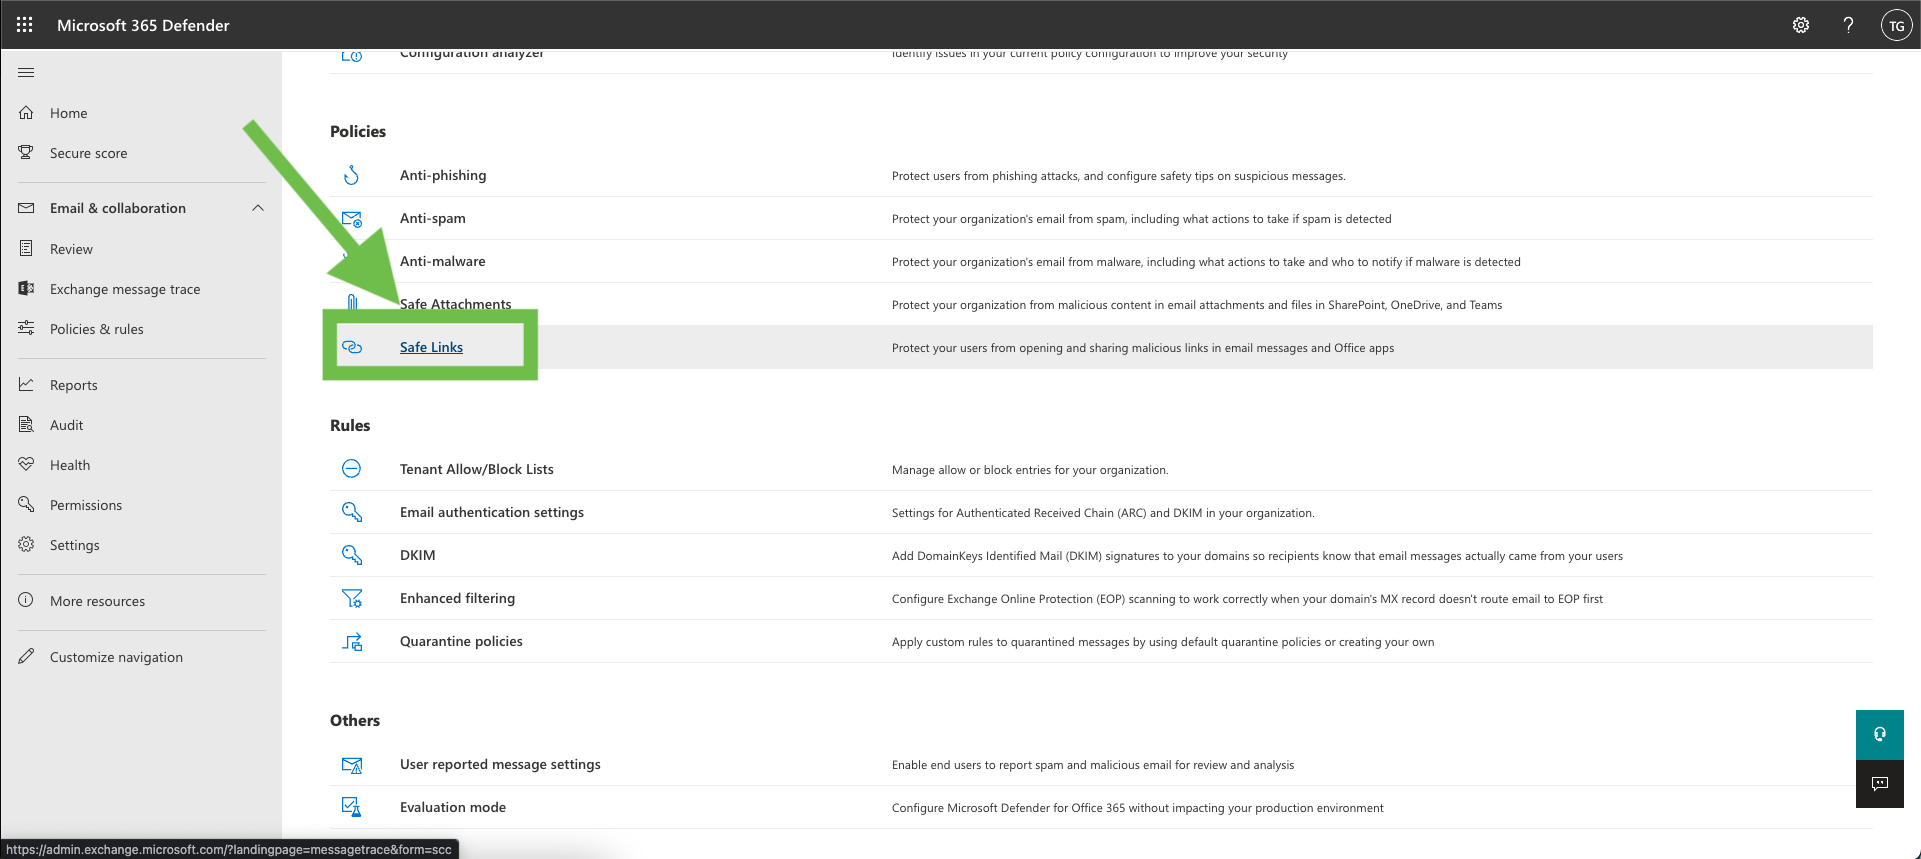
Adding Exceptions to O365 Safe Links Policy
Go to Security in your O365 environment

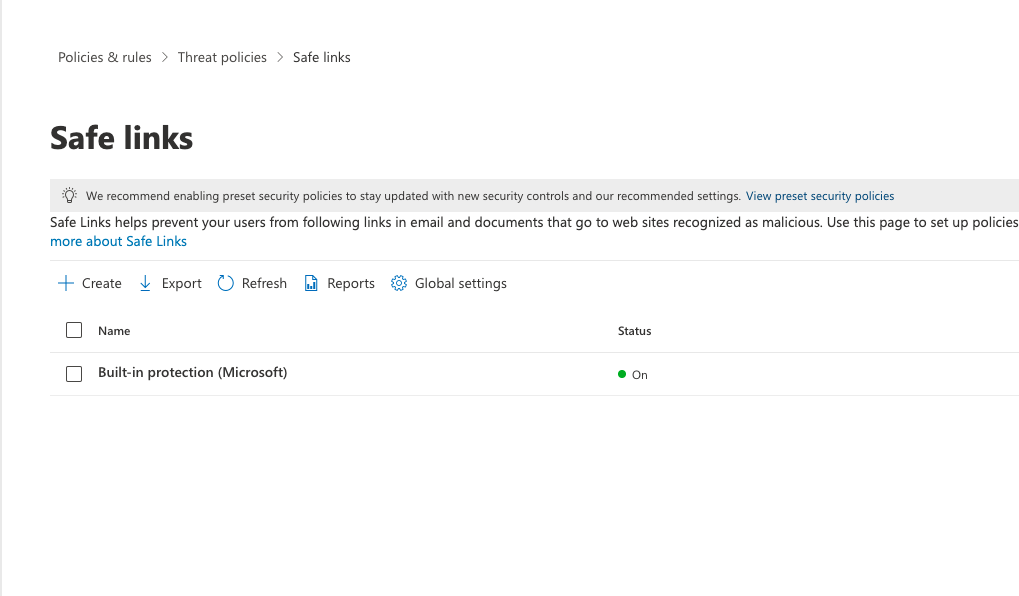
Go to “Policies & rules” → “Threat Policies”
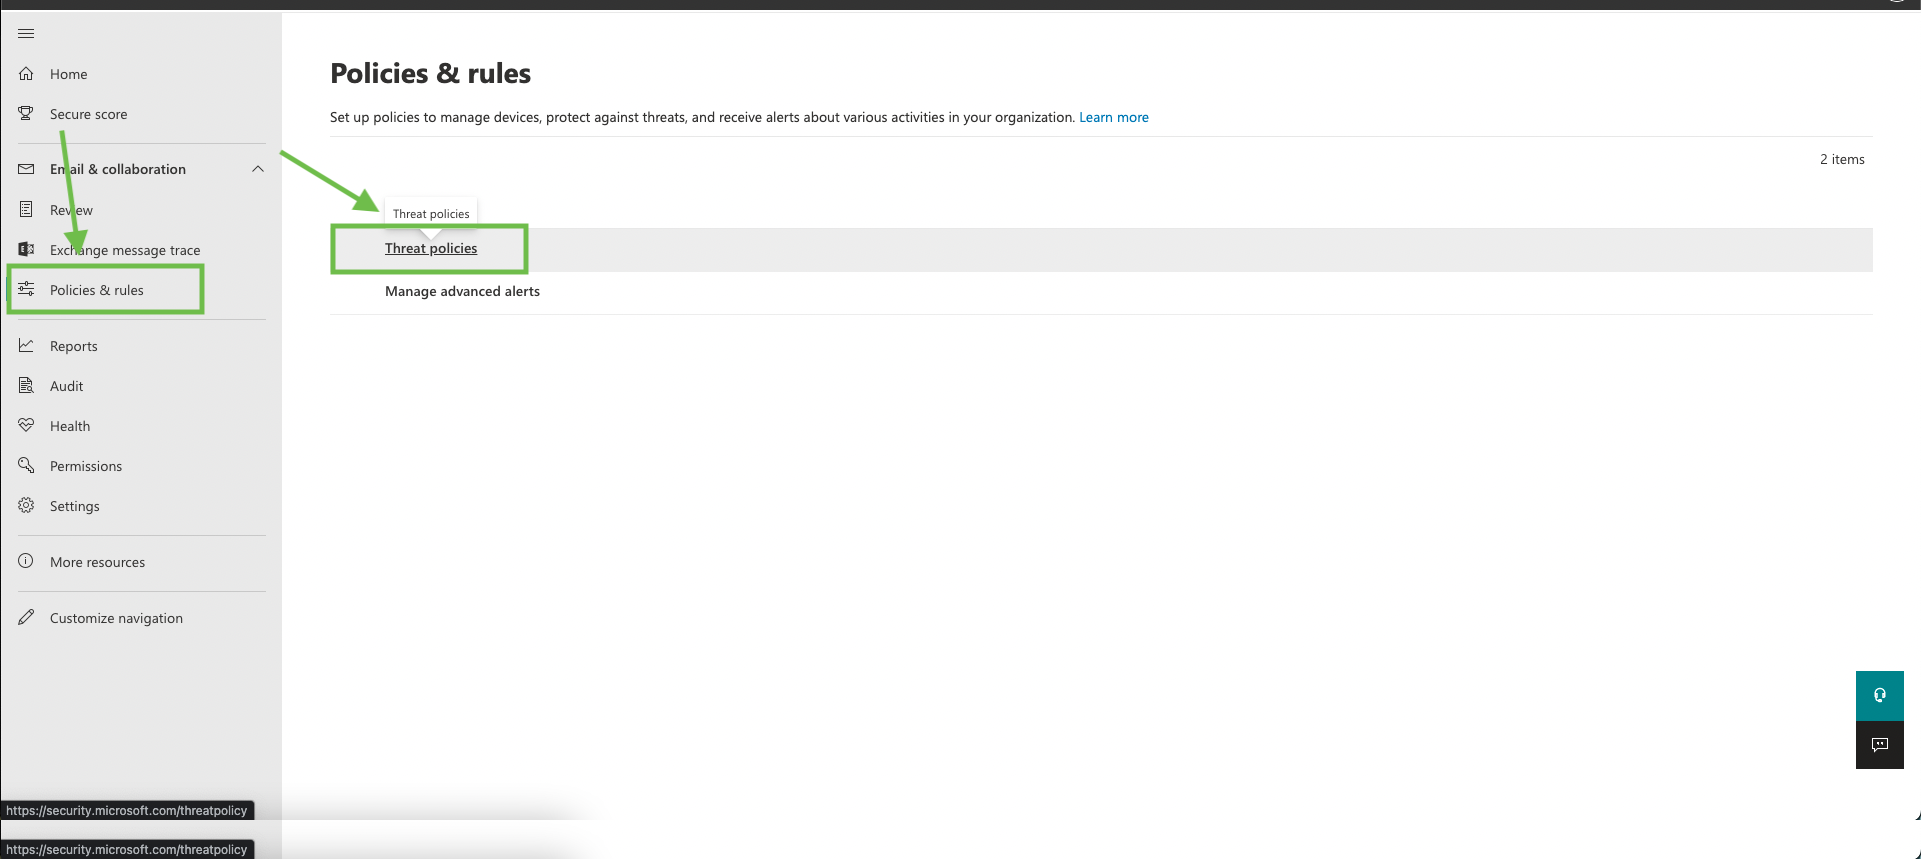
Click on “Safe Links”
Click on “Create”
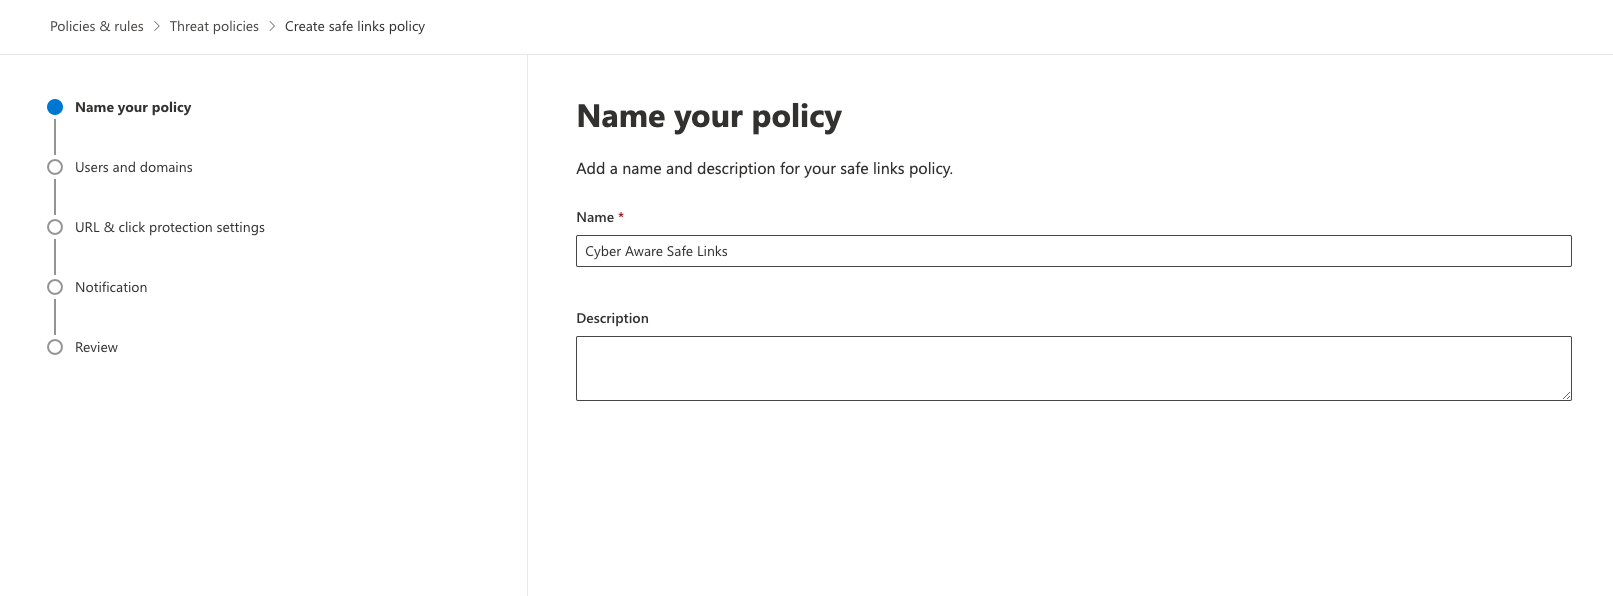
Name the policy “Cyber Aware Safe Links” and Click on “Next”
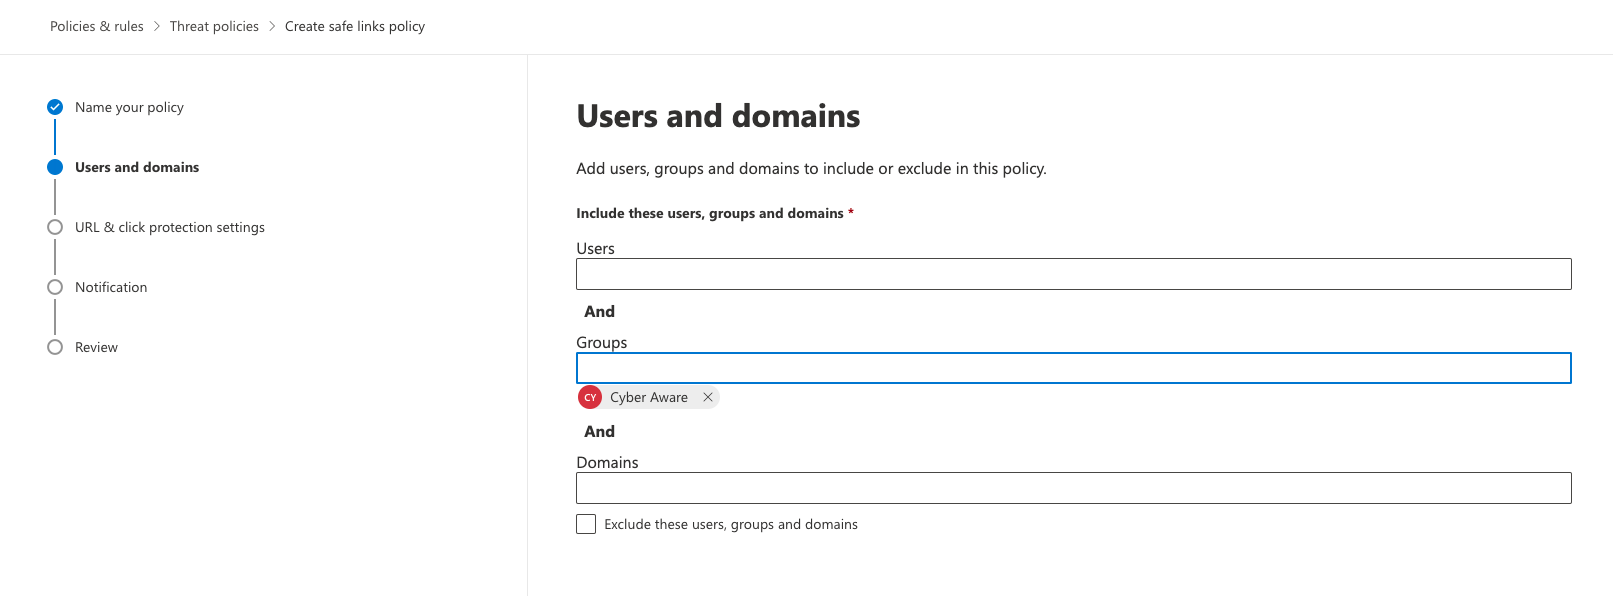
Select the users, group or domains you would like this policy to apply to. In this example I will make the group “Cyber Aware” as that group contains all my learners.
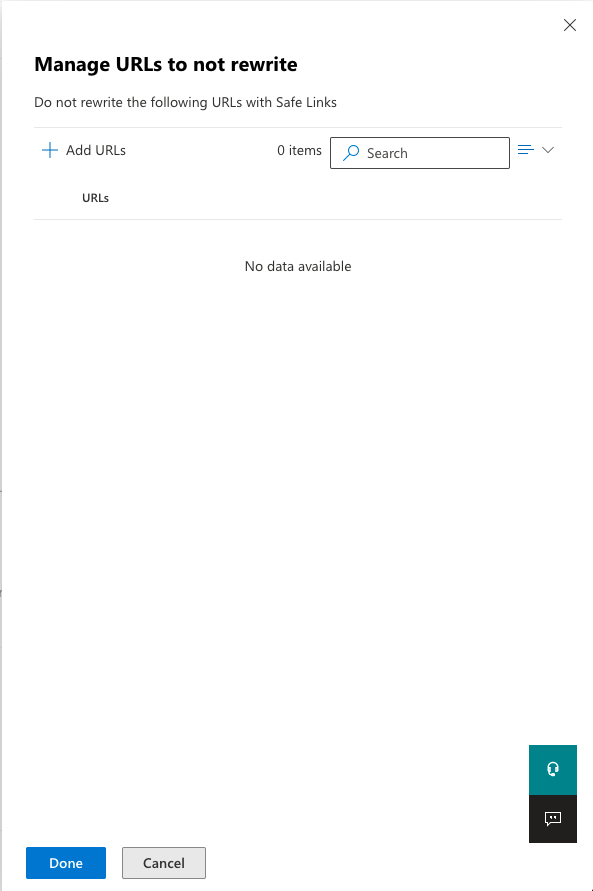
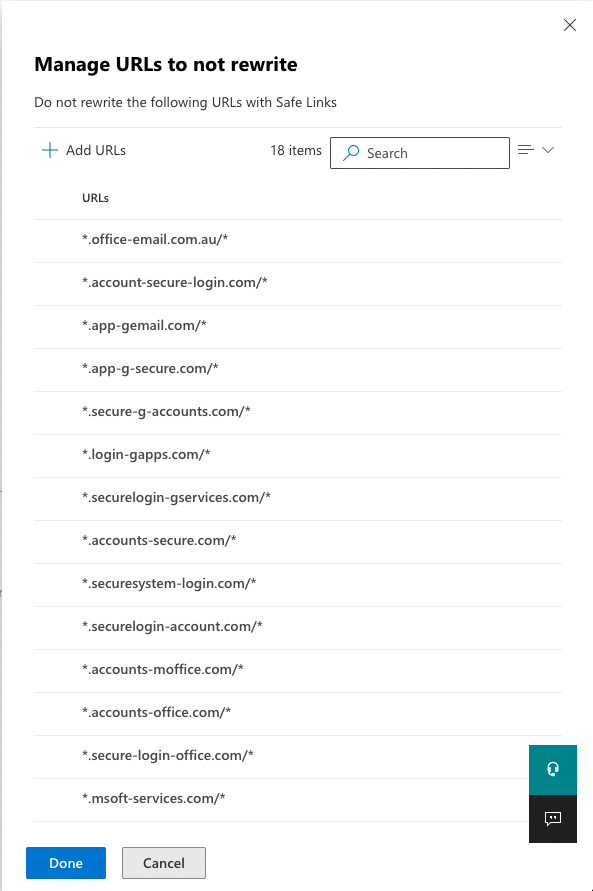
Your settings don’t need to be exactly the same as my example as they will be organisation specific. However click on “Manage 0 URLs” under “Do not rewrite the following URLs in email (0)”
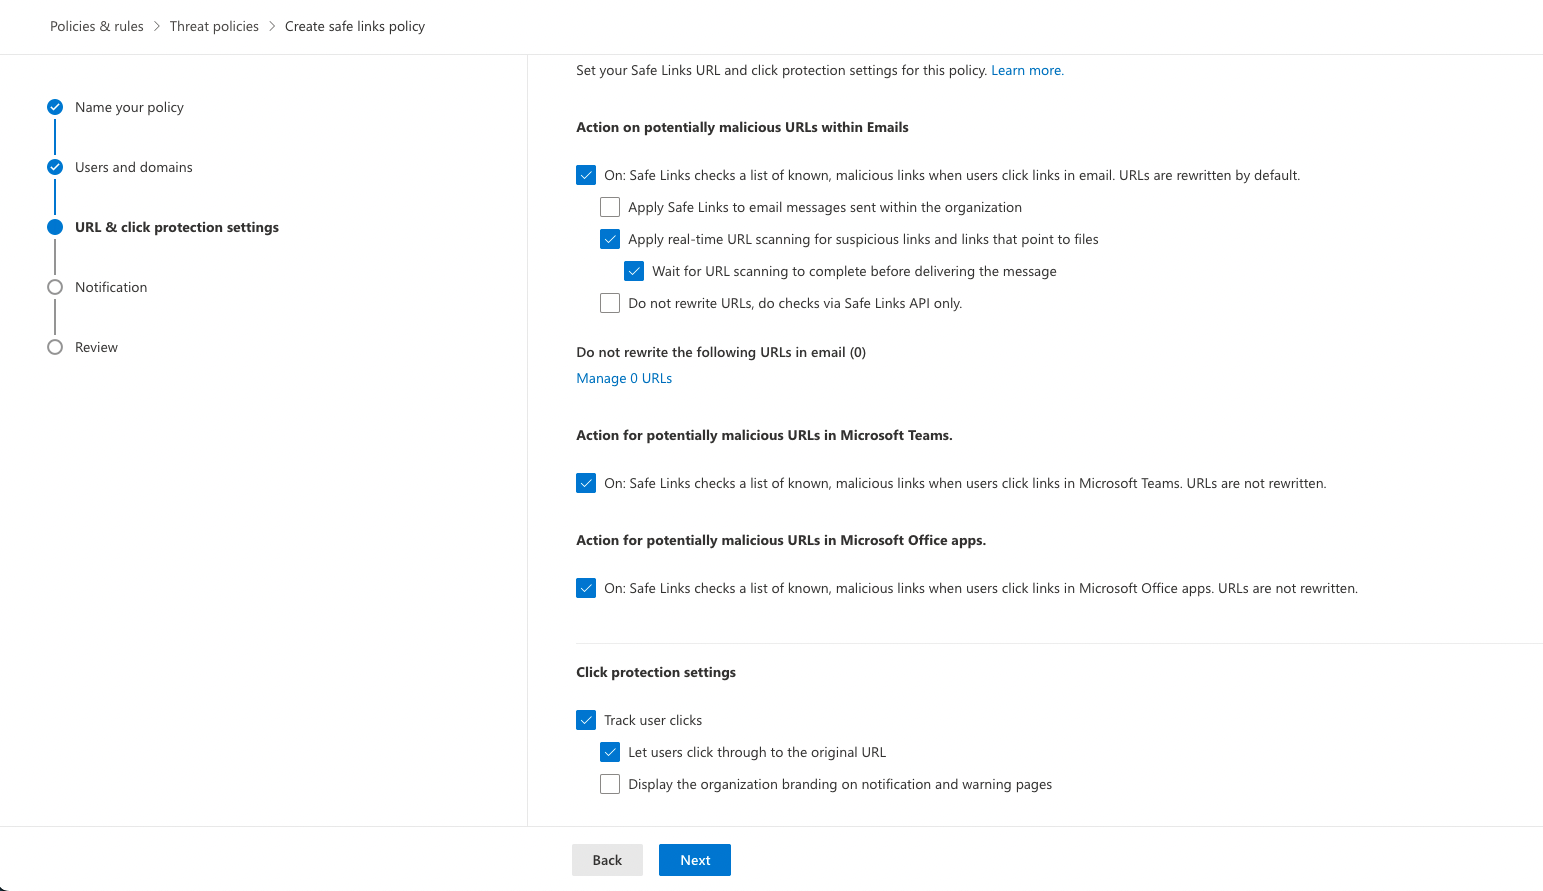
Add all the sending domains you plan on using for your phishing simulations. List of sending domains is below:
*.app-gemail.com/*
*.app-g-secure.com/*
*.login-gapps.com/*
*.app-finance.com/*
Your list should look like the below (If you plan on using all of the sending domains)
Click on “Next” two more time and then “Submit”
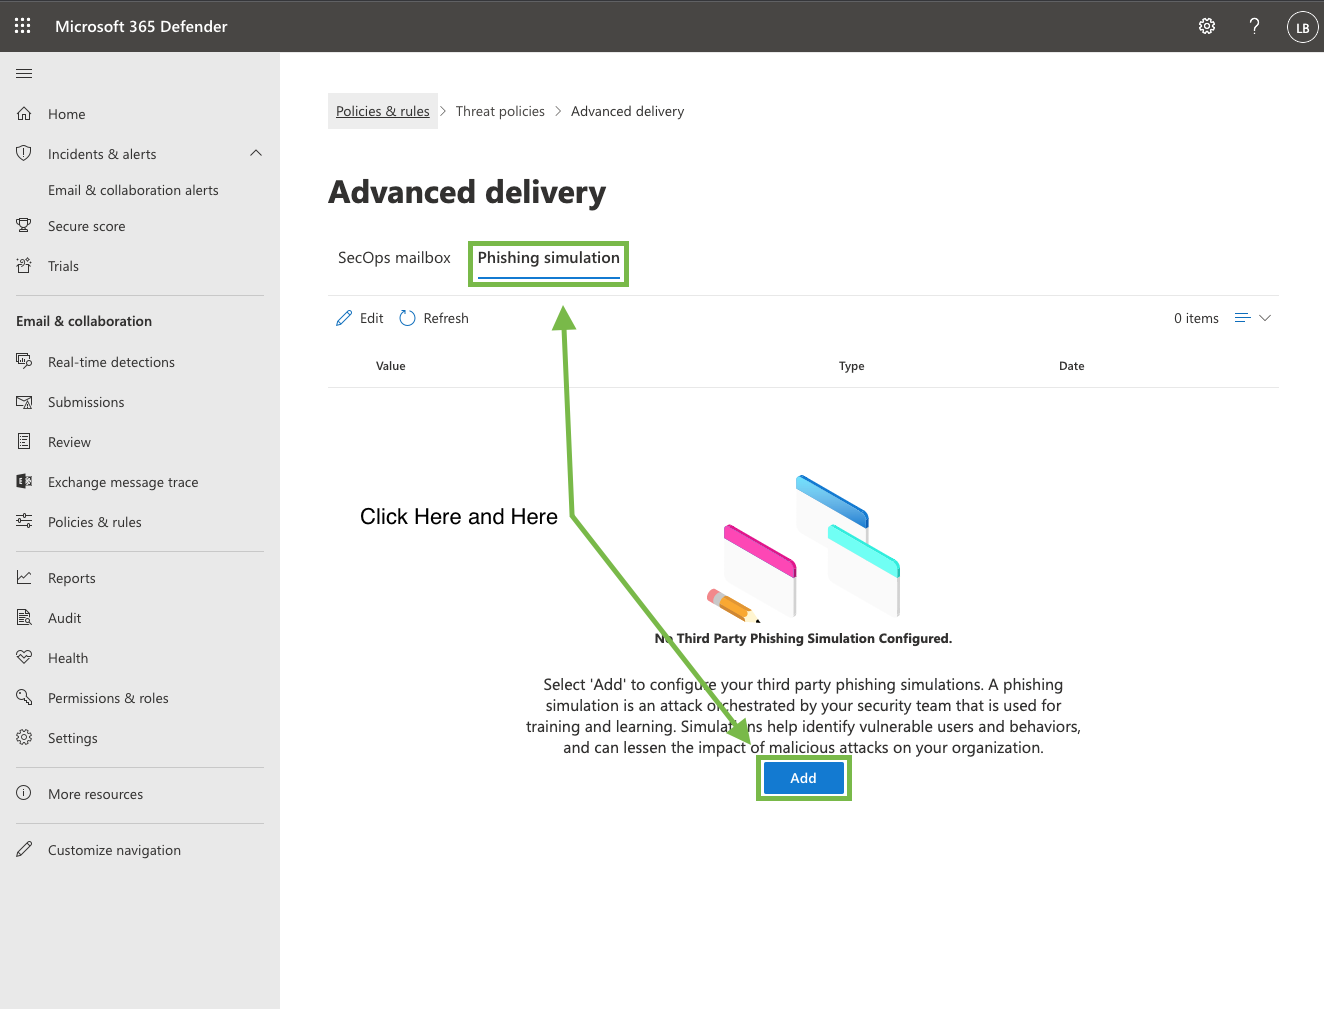
Configure Third-Party Phishing Simulations in Microsoft 365 Defender
In Defender click on “Policies & rules” → “Threat Policies” → “Advanced Delivery” → “Phishing Simulations” → “Add”
Under “Domains” enter the sending domain you plan on using:
office-email.com.au
account-secure-login.com
app-gemail.com
app-g-secure.com
secure-g-accounts.com
login-gapps.com
securelogin-gservices.com
accounts-secure.com
securesystem-login.com
securelogin-account.com
accounts-moffice.com
accounts-office.com
secure-login-office.com
msoft-services.com
office-securelogin.com
securelogin-bank.com
app-finance.com
fraudteam-finance.comUnder “Sending IP” enter in both the below IP’s:
104.130.122.237 & 159.135.224.107Under “Simulation URL” enter in the sending domains you plan on using. Please note this section only allows upto 10 URL’s.
*.app-gemail.com/*
*.app-g-secure.com/*
*.login-gapps.com/*
*.app-finance.com/*
When you’re finished, do one of the following:
First time: Click Add, and then click Close.
Edit existing: Click Save and then click Close.
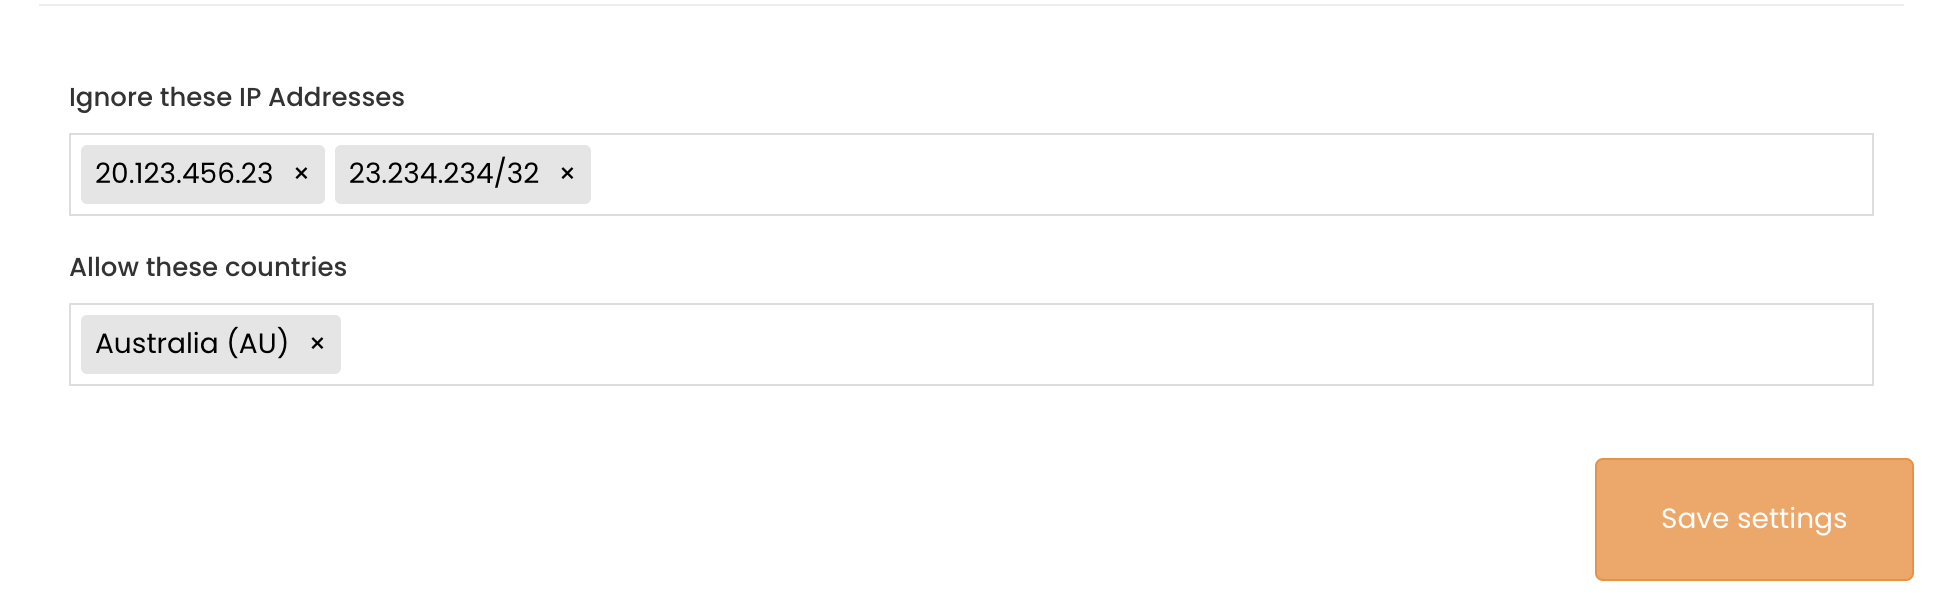
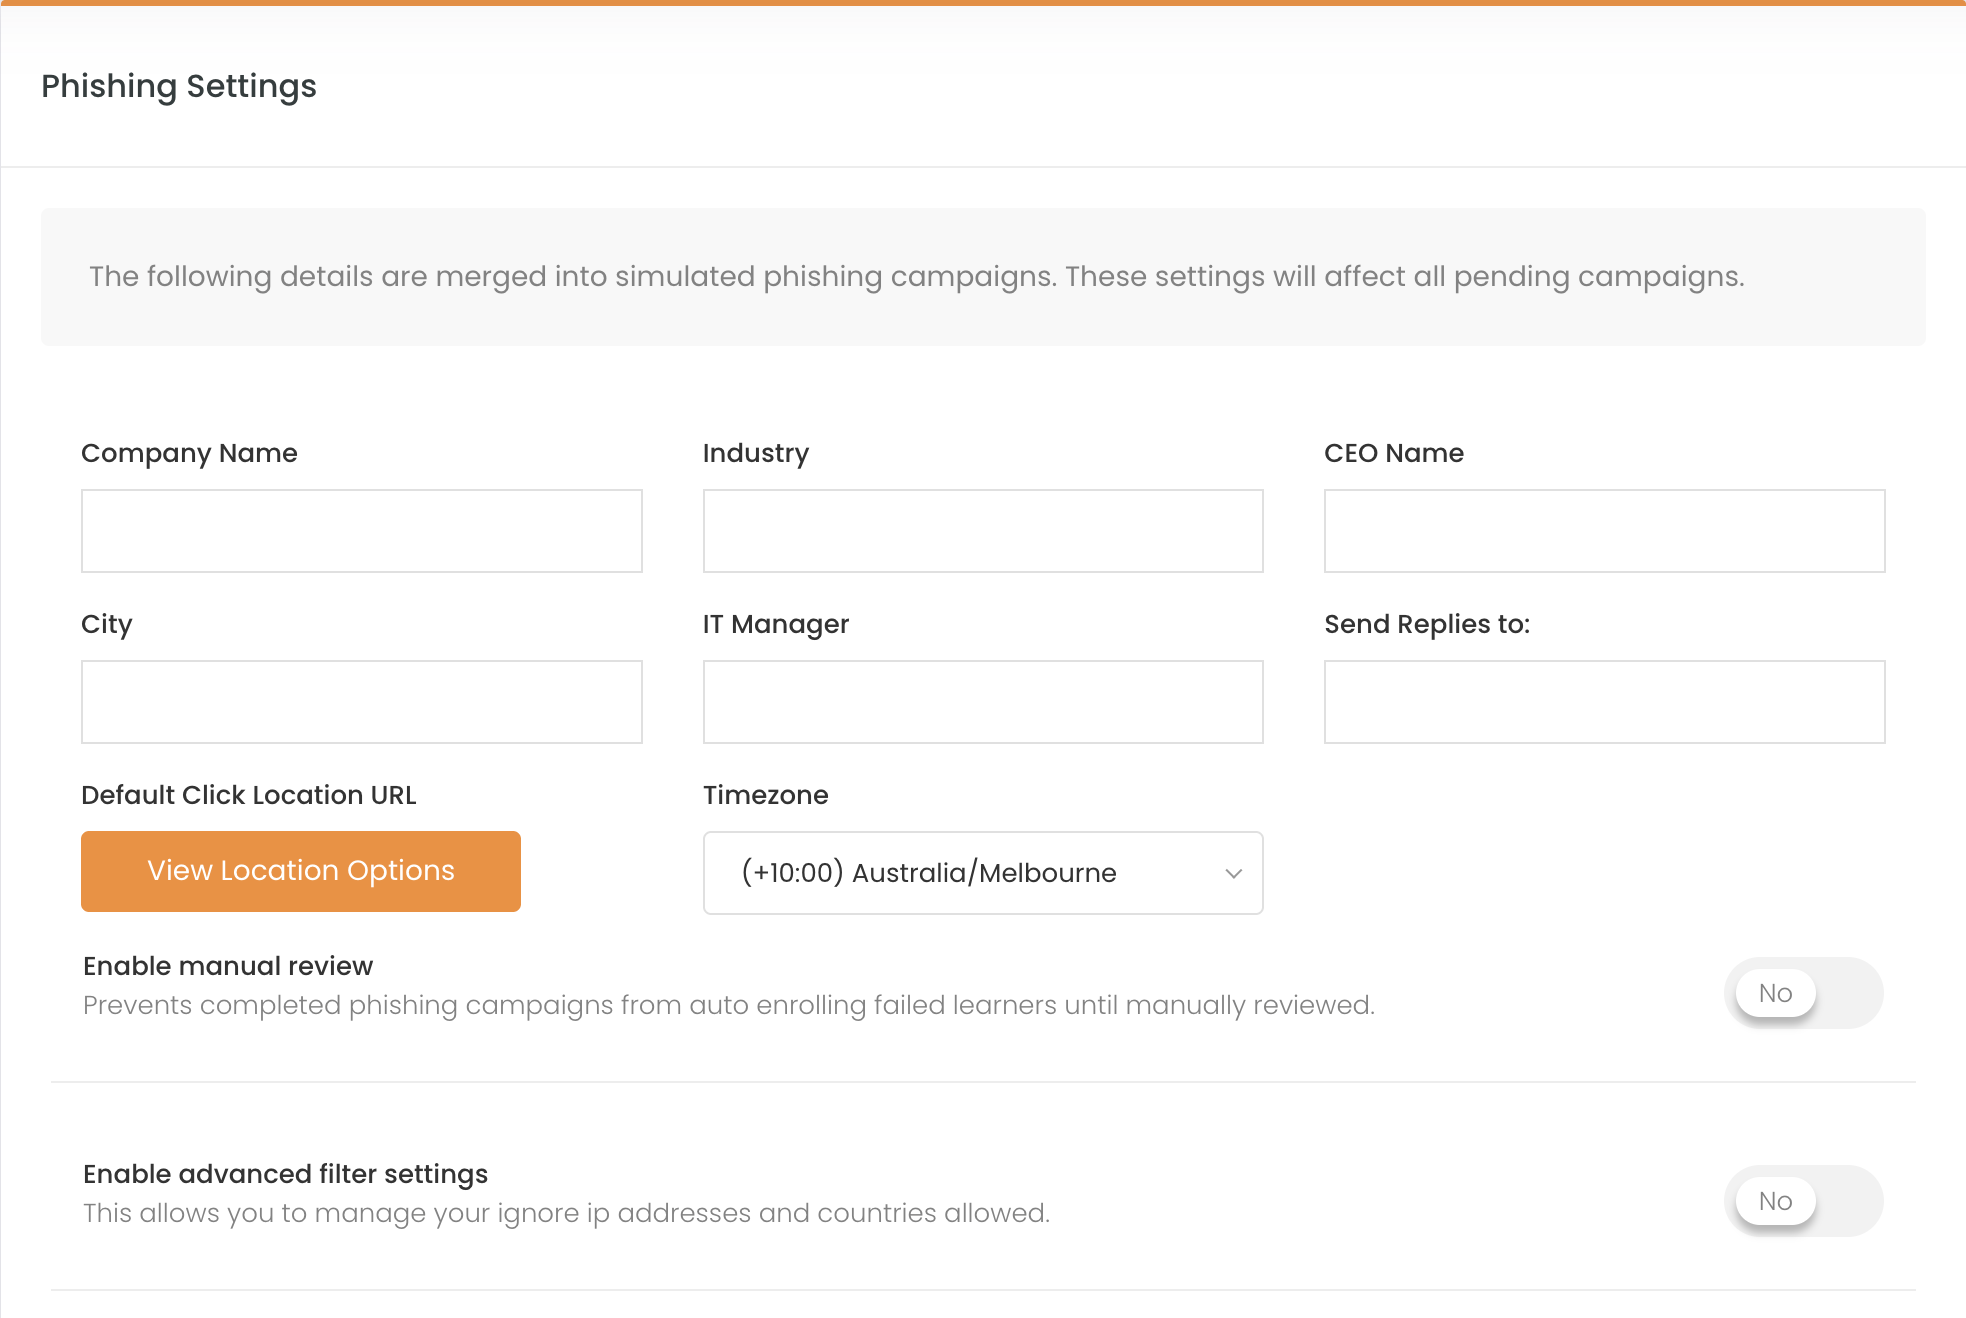
Phishing Advanced Filter Settings
Clients can set advanced filter settings for their sub-clients. These settings allow partners to filter out click events on phishing campaigns by country and IP address.
Enabling Advanced Filter Settings
To enable the phishing filter, you must log in to the target sub-client you wish to enable the settings for. Navigate to Phishing Simulation drop-down → Campaign Overview → Settings → Click the toggle for Enable advanced filter settings:
Country allow list
Within the filter settings, you will be able to set specific countries as allowed. This will allow click events from the selected countries to be reported within the phishing campaign while any clicks originating from outside the allowed countries to be excluded.
📘 Please Note:
A maximum of 80 countries is allowed to be selected
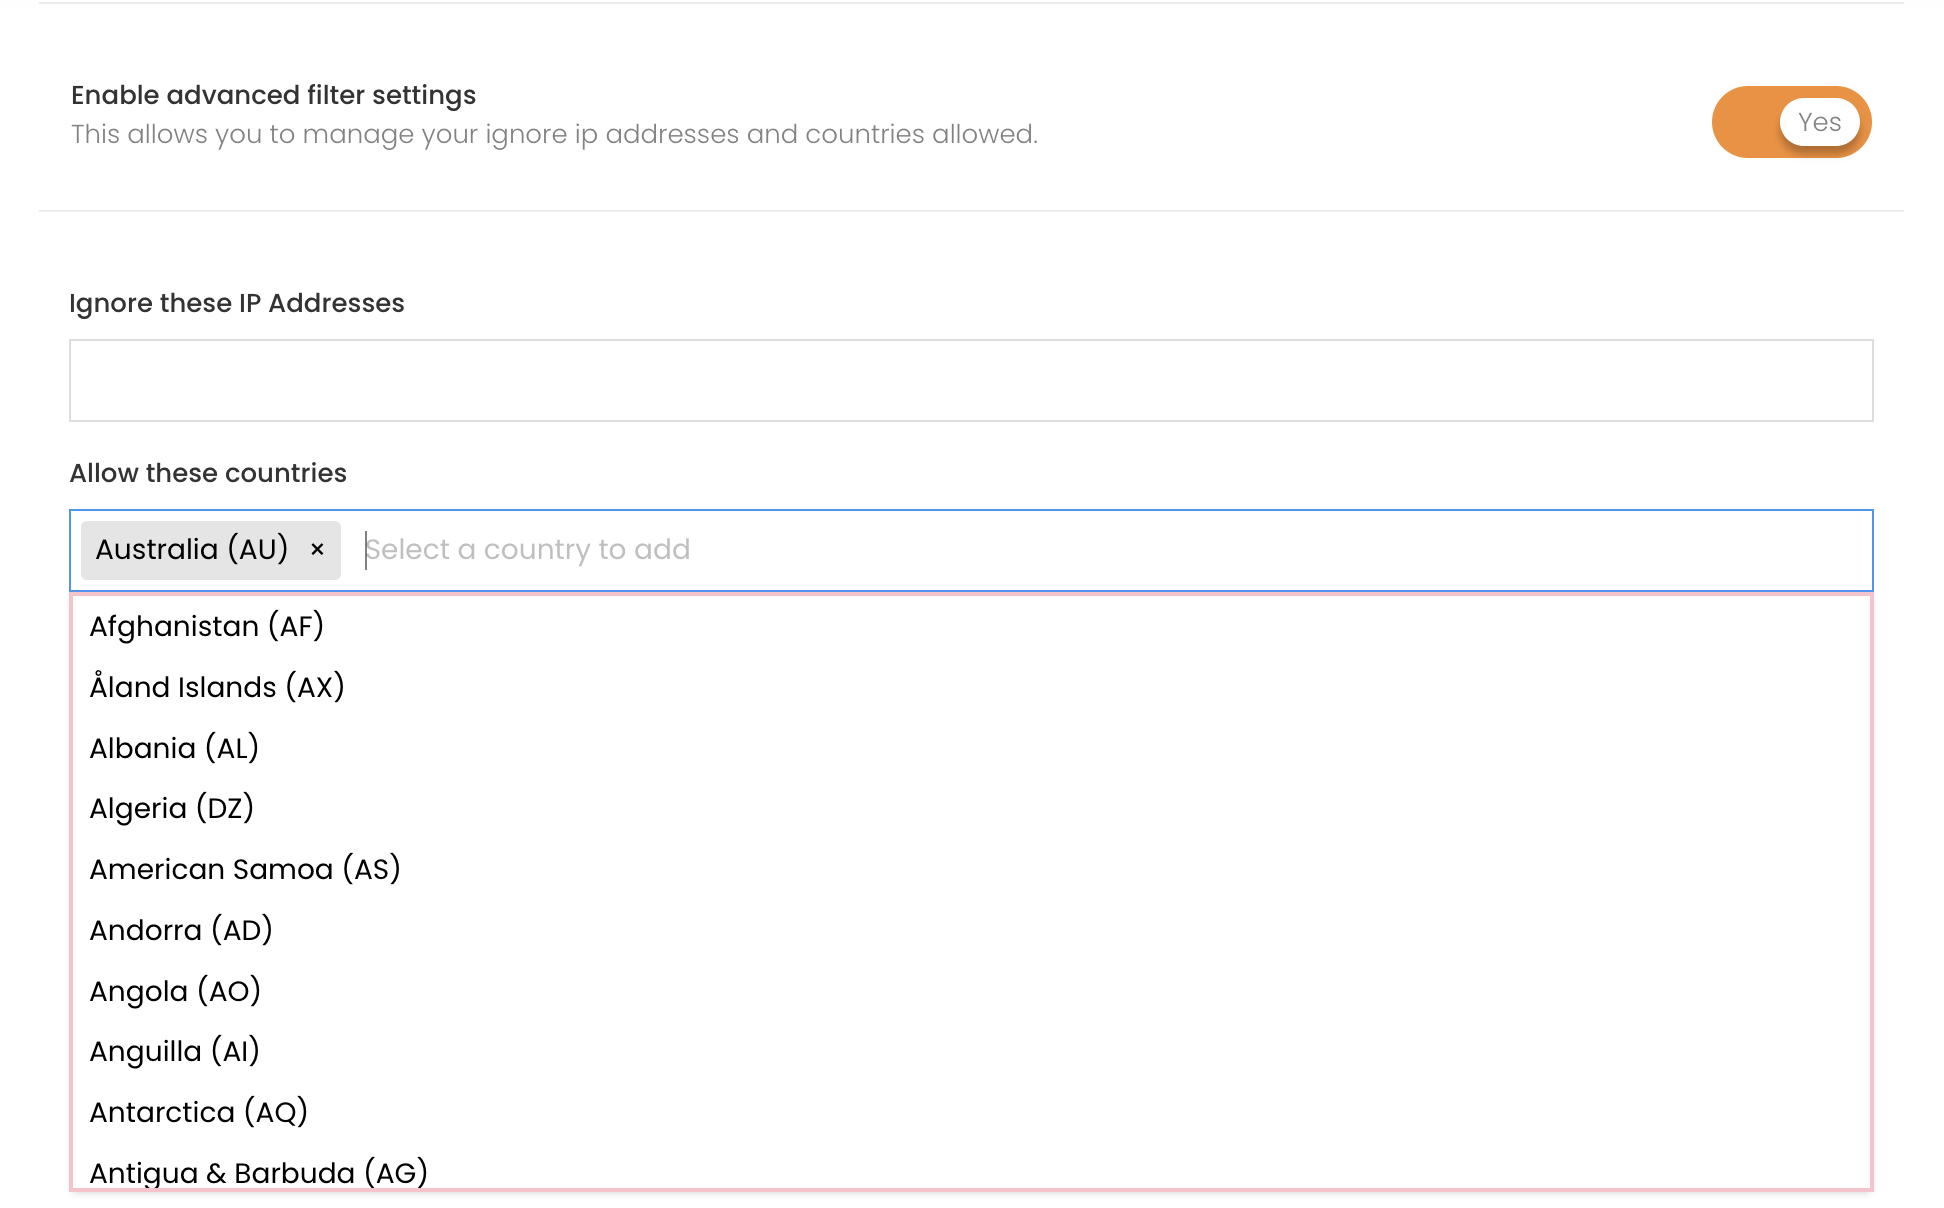
Ignore IP Addresses
The Ignore IP Address input allows for both single IP and IP range input. Adding an IP to the list will prevent click events from being registered within phishing campaign reports.